Automate ESXI Host Configuration with PowerCLI and CSV
This post is about automating ESXI host configuration by using a CSV file. First, it is worth noting that if you’re a VMware customer that is licensed for Host Profiles, then I would suggest using Host Profiles to automate configuration. Configuring multiple ESXI hosts using host profiles is a well-documented method of configuration. However, if your VCenter licensing doesn’t cover Host Profiles, or you think configuring Host Profiles can be a little flaky sometimes( as I’ve seen it to be), then this is the post for you. Also, this script configures Standard vSwitches, with the assumption that you’re a VMware customer that is not licensed for Distributed Switches. So below are the list of tasks that this script will handle.
- Configure HostName
- Configure DNS Servers for Host
- Configure Domain Information
- Configure NTP Server
- Configure ISCSI based on VMware Knowledge Base Article “Considerations for using software iSCSI port binding in ESX/ESXI“
- Configure ISCSI initiator ports
- Configure ISCSI Targets
- Configure VMotion
- Configure Physical NICs ( Place NICs on desired Vswitches and configure teaming policies )
- Configure VM Networking for up to 4 Networks
In our example, we will assume the host has 10 physical network adapters, with vmnic0 attached to the 1st vSwitch for management by default. Look for updates to this post where I upload scripts for hosts with 8, 4 and 2 physical network adapters. One prerequisite for the script to work is that a management IP address must be configured on the host prior to running the script. We will connect to the host by using PowerCLI and we will need an IP address on the host in order to connect. Also, make sure you have the latest version of PowerCLI installed before attempting to run the script.
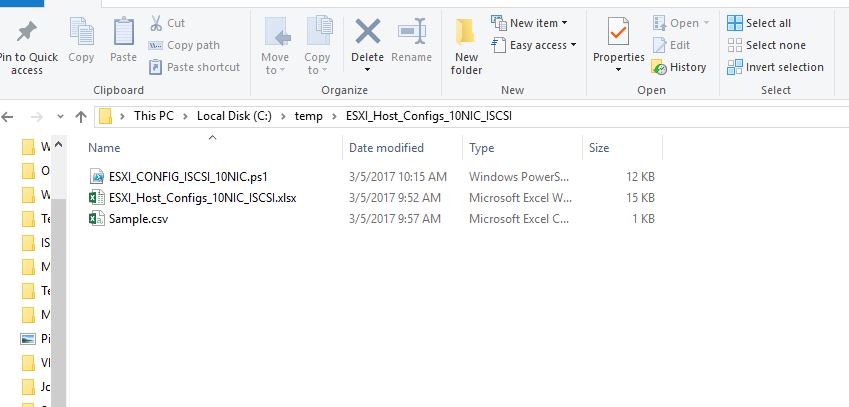
1. Download one of the following zip files based on the physical NIC configuration of your hosts. Create a C:\Temp directory on your workstation and extract the zip files to that location. The script specifically looks in that directory in order to run.
ESXI_Host_Configs_10NIC_ISCSI.ZIP
2. Open the Excel Document. You will see a number of column headers. If you hover over each of the headers, you will see a comment that explains what should be filled in.
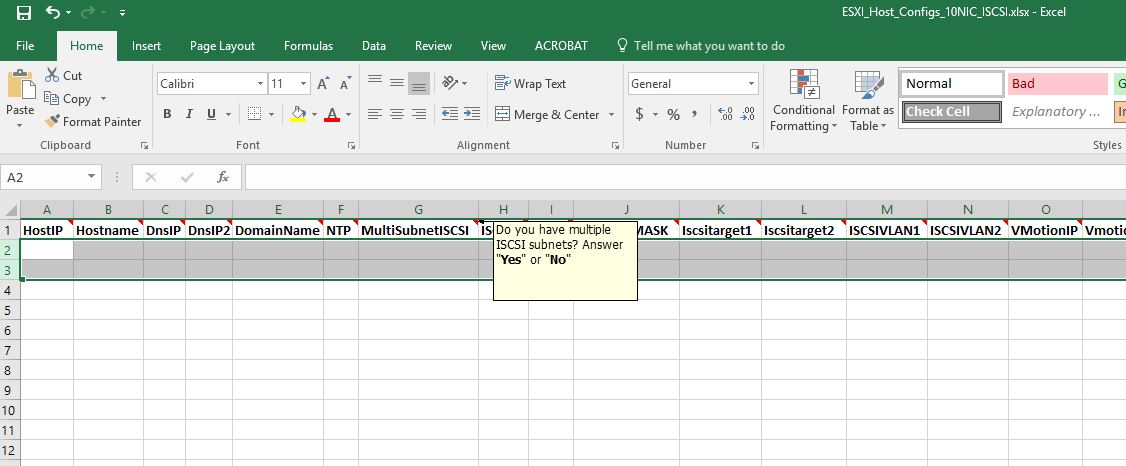
I will break down what goes in each column header below…
- HostIP – Management IP of ESXI host
- Hostname – Hostname of ESXI host ( Ex. MYCOMPANYESXIHOST1 )
- DNSIP – DNS server IP of 1st DNS server that ESXI host will use
- DNSIP2 – DNS server IP of 2ND DNS server that ESXI host will use
- DomainName – DNS domain of ESXI HOST ( Ex. Mydomain.com )
- NTP – Time Server IP for ESXI host
- MultiSubnetISCSI – Answer “Yes” or “No”, if your ISCSI network uses multiple subnets. This will determine how the ISCSI vSwitches are configured.
- ISCSI1 – Enter the IP address of your first ISCSI initiator. These will be different per host.
- ISCSI2 – Enter the IP address of your second ISCSI initiator. These will be different per host.
- ISCSISUBMASK – Enter the subnet mask for the IP addresses of your ISCSI initiators.
- ISCSITARGET1 – Enter the IP address of the first ISCSI SAN target. This will be the same per host.
- ISCSITARGET2 – Enter the IP address of the second ISCSI SAN target. This will be the same per host.
- ISCSIVLAN1 – Enter the VLAN for the IP address of your first ISCSI initiator. ( ISCSI1) If your ISCSI subnet is untagged, leave blank.
- ISCSIVLAN2 – Enter the VLAN for the IP address of your second ISCSI initiator. ( ISCSI2) If your ISCSI subnet is untagged, leave blank.
- VMotionIP – Enter the IP address of the VMotion vmkernel port.
- VMotionMask – Enter the subnet mask for the VMotion vmkernel port IP address.
- VMotionVLAN – Enter the VLAN of the VMotion vmkernel port IP address. If your VMotion vmkernel port is untagged, leave blank.
- HostPassword – Enter the root password for you ESXI host.
- PhyISCSINIC1-2 – These represent the physical network adapters that will be used for ISCSI. Because this example assumes a 10 NIC configuration and vmnic0 is already used for management, your options are vmnic1 through vmnic9. ( Note these cannot overlap with previously used vmnic adapters. )
- PhyMANNIC2 – This represents the physical network adapter that will be used for the management network. Essentially this network adapter will be teamed with vmnic0 on the management vswitch. Your options are vmnic1 through vmnic9. ( Note these cannot overlap with previously used vmnic adapters. )
- PhyLANNIC1-4 – These represent the physical network adapters that will be used for the virtual machine network vswitch. These 4 network adapters will be teamed in an active-active configuration for the virtual machine network. Your options are vmnic1 through vmnic9. ( Note these cannot overlap with previously used vmnic adapters. )
- PhyVMONIC1-2 – These represent the physical network adapters that will be used for the vmotion vswitch. Your options are vmnic1 through vmnic9. ( Note these cannot overlap with previously used vmnic adapters. )
- VMNET1NAME-VMNET4NAME – These represent the names of the virtual machine port groups that will be used for VMTraffic.
- VMNET1VLAN-VMNET4VLAN – These represent the VLANs corresponding to each virtual machine port group.
Below are screenshots of a sample configuration. There’s also a sample configuration file within the zip file.


3. Now let’s take a look at the script itself. I won’t get too detailed into the script as each section is commented based on its function, but I will just give a general overview. We are using a foreach loop to process each line in the CSV file. Everything within the foreach loop is processed for each line in the CSV and then moves on to the next. For our purposes, each line represents an ESXI host. We configure one host and then move on to the next. We are saving a transcript of the entire session to the C:\temp\ESXI_Host_Configs_10NIC_ISCSI directory for the purpose of troubleshooting any errors within the session. You also may take notice of line 33 where we enable the ESXI Shell and SSH access on the host. Feel free to tweak this if needed. But remember, everything is setup to where you should not need to edit the script! Just update the csv file and run the PowerShell script! As the script is processed you will see a progress bar for each host being configured, and the script will end with a “!!!Host Configurations Complete!!!” prompt.
# ESXI_Config_ISCSI_10NIC
# 3-05-2017
# Terrance Johnson
# Configure Multiple ESXI Hosts that have 10 physical network adapters each.

add-pssnapin vmware.vimautomation.core
##add-pssnapin vmware.vimautomation.vds - Add this snapin if using PowerCLI 5.5 or lower.
start-sleep -s 3

start-transcript -path C:\temp\ESXI_Host_Configs_10NIC_ISCSI\ESXI_Host_Config_Log.txt
$Servers = import-csv C:\temp\ESXI_Host_Configs_10NIC_ISCSI\ESXI_Host_Configs_10NIC_ISCSI.csv

$S = 0

foreach($Server in $Servers)
{

    # Connect to each ESXI Host
    connect-viserver -server $Server.HostIP -protocol https -user root -password $Server.HostPassword
    $esxcli = get-esxcli
    $HostNet = get-vmhostnetwork
    $Host1 = Get-VMHost
    set-vmhostnetwork -Network $HostNet -Hostname $Server.Hostname -DomainName $Server.DomainName -SearchDomain $Server.DomainName

    # Set NTP Server on Hosts
    add-vmhostntpserver -ntpserver $Server.NTP
    get-vmhostservice | where {$_.Key -eq "ntpd" } | Start-VMHostService
    get-vmhostservice | where {$_.Key -eq "ntpd" } | Set-VMHostService -Policy "Automatic"

    # Set DNS Servers on Hosts
    Set-VMHostNetwork -Network $HostNet -DnsAddress $Server.DnsIP,$Server.DNSIP2

    ## Turn on ESXI SHELL and SSH Access

    get-vmhostservice | where {$_.Key -eq "TSM-SSH" } | set-vmhostservice -policy "Automatic"
    get-vmhostservice | where {$_.Key -eq "TSM-SSH" } | start-vmhostservice
    get-vmhostservice | where {$_.Key -eq "TSM" } | set-vmhostservice -policy "Automatic"
    get-vmhostservice | where {$_.Key -eq "TSM" } | start-vmhostservice

    # Build ISCSI vSwitches
    if($Server.MultiSubNetISCSI -eq "Yes")
    {

    New-VirtualSwitch -VMHost $Host1 -Name "ISCSI 1" -Mtu 9000
    New-VirtualSwitch -VMHost $Host1 -Name "ISCSI 2" -Mtu 9000
    $iVSwitch1 = get-virtualswitch -vmhost $Host1 -Name "ISCSI 1"
    $iVSwitch2 = get-virtualswitch -vmhost $Host1 -Name "ISCSI 2"

    New-VMHostNetworkAdapter -VMHost $Host1 -PortGroup iscsi1 -VirtualSwitch $iVSwitch1 -MTU 9000
    New-VMHostNetworkAdapter -VMHost $Host1 -PortGroup iscsi2 -VirtualSwitch $iVSwitch2 -MTU 9000


    # Adds Physical Adapters to ISCSI vSwitches.

    $PHYSISCSI1 = $Host1 | get-vmhostnetworkadapter -Physical -name $Server.PhyISCSINIC1
    $iVSwitch1 | Add-VirtualSwitchPhysicalNetworkAdapter -VMHostPhysicalNic $PHYSISCSI1 -Confirm:$false

    $PHYSISCSI2 = $Host1 | get-vmhostnetworkadapter -Physical -name $Server.PhyISCSINIC2
    $iVSwitch2 | Add-VirtualSwitchPhysicalNetworkAdapter -VMHostPhysicalNic $PHYSISCSI2 -Confirm:$false

    # Sets IP Address of ISCSI VMKERNEL PORTS

    $ISCSI1 = get-vmhostnetworkadapter | where { $_.portgroupname -eq "iscsi1" }
    set-vmhostnetworkadapter -virtualnic $ISCSI1 -ip $Server.ISCSI1 -SubnetMask $Server.iscsisubmask -Confirm:$false

    $ISCSI2 = get-vmhostnetworkadapter | where { $_.portgroupname -eq "iscsi2" }
    set-vmhostnetworkadapter -virtualnic $ISCSI2 -ip $Server.ISCSI2 -SubnetMask $Server.iscsisubmask -Confirm:$false

    # Sets VLAN on ISCSI vmkernel port if tagged

    $ISCSI1VLAN = get-virtualportgroup -name iscsi1
    $ISCSI2VLAN = get-virtualportgroup -name iscsi2
        if($Server.iSCSIVLAN1 -eq "")
        {
        Write-Host "ISCSI 1 VLAN IS UNTAGGED!!!!" -ForegroundColor Green
        }
        else
        {
        set-virtualportgroup -virtualportgroup $ISCSI1VLAN -vlanid $Server.iscsivlan1
        }
        if($Server.iSCSIVLAN2 -eq "")
        {
        Write-Host "ISCSI 2 VLAN IS UNTAGGED!!!!" -ForegroundColor Green
        }
        else
        {
        set-virtualportgroup -virtualportgroup $ISCSI1VLAN -vlanid $Server.iscsivlan2
        }

    }
    else
    {
    #Create Single VSWitch with Multiple VMkernel ISCSI adapters on same Subnet

    New-VirtualSwitch -VMHost $Host1 -Name "ISCSI" -Mtu 9000
    $iVSwitch = get-virtualswitch -vmhost $Host1 -Name "ISCSI"

    New-VMHostNetworkAdapter -VMHost $Host1 -PortGroup iscsi1 -VirtualSwitch $iVSwitch -MTU 9000
    New-VMHostNetworkAdapter -VMHost $Host1 -PortGroup iscsi2 -VirtualSwitch $iVSwitch -MTU 9000

    # Adds Physical Adapters to ISCSI vSwitches.

    $PHYSISCSI1 = $Host1 | get-vmhostnetworkadapter -Physical -name $Server.PhyISCSINIC1
    $iVSwitch | Add-VirtualSwitchPhysicalNetworkAdapter -VMHostPhysicalNic $PHYSISCSI1 -Confirm:$false

    $PHYSISCSI2 = $Host1 | get-vmhostnetworkadapter -Physical -name $Server.PhyISCSINIC2
    $iVSwitch | Add-VirtualSwitchPhysicalNetworkAdapter -VMHostPhysicalNic $PHYSISCSI2 -Confirm:$false

    # Sets IP Address of ISCSI VMKERNEL PORTS

    $ISCSI1 = get-vmhostnetworkadapter | where { $_.portgroupname -eq "iscsi1" }
    set-vmhostnetworkadapter -virtualnic $ISCSI1 -ip $Server.ISCSI1 -SubnetMask $Server.iscsisubmask -Confirm:$false

    $ISCSI2 = get-vmhostnetworkadapter | where { $_.portgroupname -eq "iscsi2" }
    set-vmhostnetworkadapter -virtualnic $ISCSI2 -ip $Server.ISCSI2 -SubnetMask $Server.iscsisubmask -Confirm:$false

    # Sets VLAN on ISCSI vmkernel port if tagged

    $ISCSI1VLAN = get-virtualportgroup -name iscsi1
    $ISCSI2VLAN = get-virtualportgroup -name iscsi2
        if($Server.iSCSIVLAN1 -eq "")
        {
        Write-Host "ISCSI 1 VLAN IS UNTAGGED!!!!" -ForegroundColor Green
        }
        else
        {
        set-virtualportgroup -virtualportgroup $ISCSI1VLAN -vlanid $Server.iscsivlan1
        }
        if($Server.iSCSIVLAN2 -eq "")
        {
        Write-Host "ISCSI 2 VLAN IS UNTAGGED!!!!" -ForegroundColor Green
        }
        else
        {
        set-virtualportgroup -virtualportgroup $ISCSI1VLAN -vlanid $Server.iscsivlan2
        }

    #Sets ISCSI Teaming Policies
    $ISCSI1TEAMPOLICY = get-virtualportgroup | where { $_.Name -eq "iscsi1" } | Get-NicTeamingPolicy
    Set-NicTeamingPolicy -VirtualPortGroupPolicy $ISCSI1TEAMPOLICY -InheritFailoverOrder $false
    Set-NicTeamingPolicy -VirtualPortGroupPolicy $ISCSI1TEAMPOLICY -MakeNicActive $Server.PhyISCSINIC1
    Set-NicTeamingPolicy -VirtualPortGroupPolicy $ISCSI1TEAMPOLICY -MakeNicUnused $Server.PhyISCSINIC2

    $ISCSI2TEAMPOLICY = get-virtualportgroup | where { $_.Name -eq "iscsi2" } | Get-NicTeamingPolicy
    Set-NicTeamingPolicy -VirtualPortGroupPolicy $ISCSI2TEAMPOLICY -InheritFailoverOrder $false
    Set-NicTeamingPolicy -VirtualPortGroupPolicy $ISCSI2TEAMPOLICY -MakeNicActive $Server.PhyISCSINIC2
    Set-NicTeamingPolicy -VirtualPortGroupPolicy $ISCSI2TEAMPOLICY -MakeNicUnused $Server.PhyISCSINIC1

    }


#Enables iSCSI Software Initiator

get-vmhoststorage | Set-Vmhoststorage -SoftwareISCSIenabled $true

start-sleep -s 5

#Add Network Adapter and Targets to iSCSI Initiator and use port binding if using a single subnet.

if($Server.MultiSubNetISCSI -eq "Yes")
{
write-host "!!!VMkernel ports used for ISCSI are in different broadcast domains/subnets. Will Not Use Port Binding!!!" -ForegroundColor Green
}
else
{
$iscsisoftware = get-vmhosthba -type iscsi | where { $_.status -eq "online"}
$vmk1number = 'vmk1'
$vmk2number = 'vmk2'
$esxcli.iscsi.networkportal.add($iscsisoftware,$true,$vmk1number)
$esxcli.iscsi.networkportal.add($iscsisoftware,$true,$vmk2number)
}


#Add IP Addresses of ISCSI Targets

$iscsisoftware = get-vmhosthba -type iscsi | where { $_.status -eq "online"}

$iscsisoftware | New-IScsiHbaTarget -Address $Server.Iscsitarget1
$iscsisoftware | New-IScsiHbaTarget -Address $Server.Iscsitarget2

# Create VM Network Switch
New-VirtualSwitch -VMHost $Host1 -Name "Virtual Machine Network"

# Add VM Networks Switch Port Group

$VMNETSWITCH = get-virtualswitch -vmhost $Host1 -Name "Virtual Machine Network"
New-VirtualPortGroup -Name $Server.VMNET1NAME -VLanId $SERVER.VMNET1VLAN -VirtualSwitch $VMNETSWITCH
New-VirtualPortGroup -Name $Server.VMNET2NAME -VLanId $SERVER.VMNET2VLAN -VirtualSwitch $VMNETSWITCH
New-VirtualPortGroup -Name $Server.VMNET3NAME -VLanId $SERVER.VMNET3VLAN -VirtualSwitch $VMNETSWITCH
New-VirtualPortGroup -Name $Server.VMNET4NAME -VLanId $SERVER.VMNET4VLAN -VirtualSwitch $VMNETSWITCH

#Add Physical Network Adapters to Default Management Network Switch

$DEFAULTMANAGEMENTSWITCH = get-virtualswitch -vmhost $Host1 -Name "vSwitch0"
$PHYMANNIC2 = $Host1 | get-vmhostnetworkadapter -Physical -name $Server.PhyMANNIC2
$DEFAULTMANAGEMENTSWITCH | Add-VirtualSwitchPhysicalNetworkAdapter -VMHostPhysicalNic $PHYMANNIC2 -Confirm:$false


#Set Teaming Policy on Defualt Manaement Switch

$DefaultManTeam = get-virtualportgroup | where { $_.Name -eq "Management Network" } | Get-NicTeamingPolicy
Set-NicTeamingPolicy -VirtualPortGroupPolicy $DefaultManTeam -InheritFailoverOrder $false
Set-NicTeamingPolicy -VirtualPortGroupPolicy $DefaultManTeam -MakeNicStandby $Server.PhyMANNIC2

#Add Physical Network Adapters to VM Network Switch

$PHYLANNIC1 = $Host1 | get-vmhostnetworkadapter -Physical -name $Server.PhyLANNIC1
$VMNETSWITCH | Add-VirtualSwitchPhysicalNetworkAdapter -VMHostPhysicalNic $PHYLANNIC1 -Confirm:$false
$PHYLANNIC2 = $Host1 | get-vmhostnetworkadapter -Physical -name $Server.PhyLANNIC2
$VMNETSWITCH | Add-VirtualSwitchPhysicalNetworkAdapter -VMHostPhysicalNic $PHYLANNIC2 -Confirm:$false
$PHYLANNIC3 = $Host1 | get-vmhostnetworkadapter -Physical -name $Server.PhyLANNIC3
$VMNETSWITCH | Add-VirtualSwitchPhysicalNetworkAdapter -VMHostPhysicalNic $PHYLANNIC3 -Confirm:$false
$PHYLANNIC4 = $Host1 | get-vmhostnetworkadapter -Physical -name $Server.PhyLANNIC4
$VMNETSWITCH | Add-VirtualSwitchPhysicalNetworkAdapter -VMHostPhysicalNic $PHYLANNIC4 -Confirm:$false


#Add Physical Network Adapters to VM Network Switch

New-VirtualSwitch -VMHost $Host1 -Name "VMotion" -Mtu 9000

# Add VMotion Network Swith Port Group

$VMotionSWITCH = get-virtualswitch -vmhost $Host1 -Name "VMotion"
New-VMHostNetworkAdapter -VMHost $Host1 -PortGroup "VMotion" -VirtualSwitch $VMotionSWITCH -VMotionEnabled $true -MTU 9000

# Add Physical Network Adapters to VMotion Network Swtich will need to edit !!!!

$PHYVMONIC1 = $Host1 | get-vmhostnetworkadapter -Physical -name $Server.PhyVMONIC1
$VMotionSWITCH | Add-VirtualSwitchPhysicalNetworkAdapter -VMHostPhysicalNic $PHYVMONIC1 -Confirm:$false
$PHYVMONIC2 = $Host1 | get-vmhostnetworkadapter -Physical -name $Server.PhyVMONIC2
$VMotionSWITCH | Add-VirtualSwitchPhysicalNetworkAdapter -VMHostPhysicalNic $PHYVMONIC2 -Confirm:$false

# Sets IP Address of VMotion Port Group
$Vmotion = get-vmhostnetworkadapter | where { $_.portgroupname -eq "VMotion" }
set-vmhostnetworkadapter -virtualnic $Vmotion -ip $Server.VMotionIP -SubnetMask $Server.VmotionMask -Confirm:$false

# Set NIC Teaming Policy for VMotion
$VMOTEAMPOLICY = get-virtualportgroup | where { $_.Name -eq "VMotion" } | Get-NicTeamingPolicy
Set-NicTeamingPolicy -VirtualPortGroupPolicy $VMOTEAMPOLICY -InheritFailoverOrder $false
Set-NicTeamingPolicy -VirtualPortGroupPolicy $VMOTEAMPOLICY -MakeNicActive $Server.PhyVMONIC1
Set-NicTeamingPolicy -VirtualPortGroupPolicy $VMOTEAMPOLICY -MakeNicStandby $Server.PhyVMONIC2

# Set VMotion VLAN
$VMOVLAN = get-virtualportgroup -name VMotion
set-virtualportgroup -virtualportgroup $VMOVLAN -vlanid $Server.VmotionVLAN

Disconnect-viserver -Server * -Force -Confirm:$false

$S++
Write-Progress -Activity "Configuring ESXI Hosts" -status "Configured: $S of $($Servers.Count)" -PercentComplete (($S / $Servers.Count) * 100)

    }


Write-Host "!!!Host Configurations Complete!!!" -ForegroundColor Green

Stop-Transcript
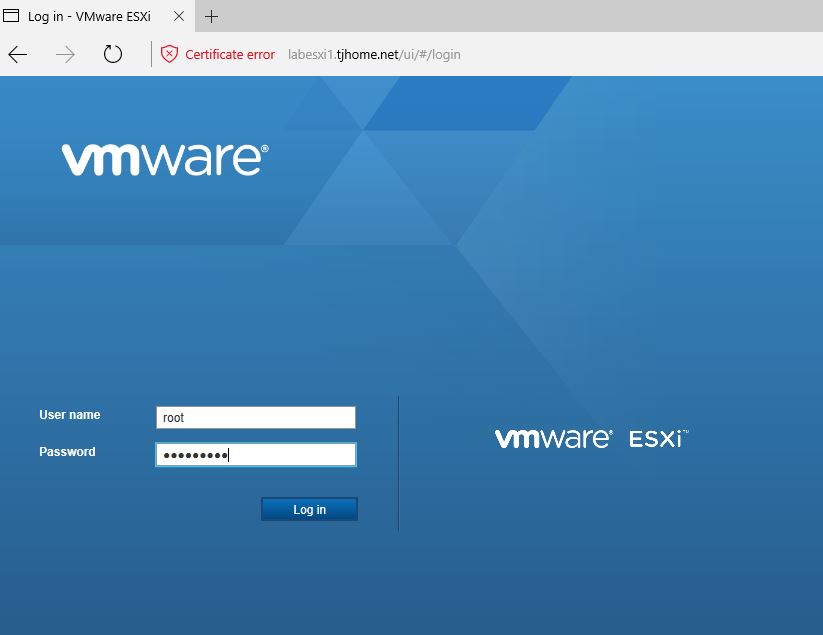
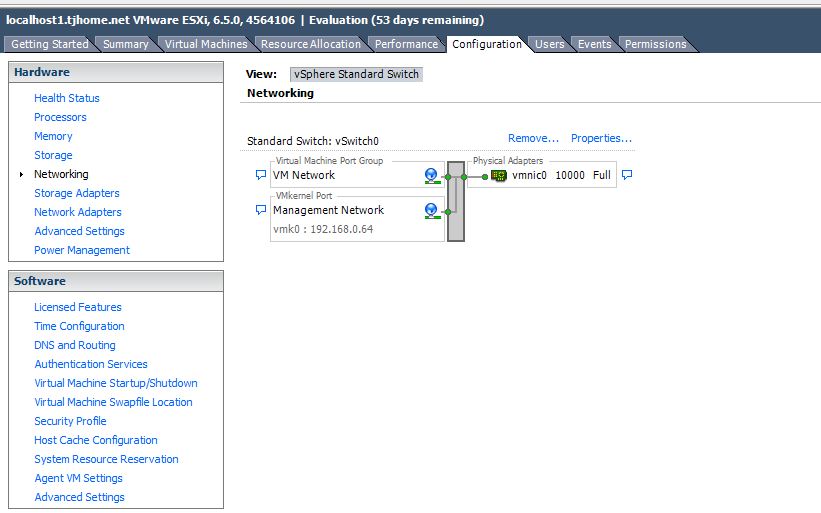
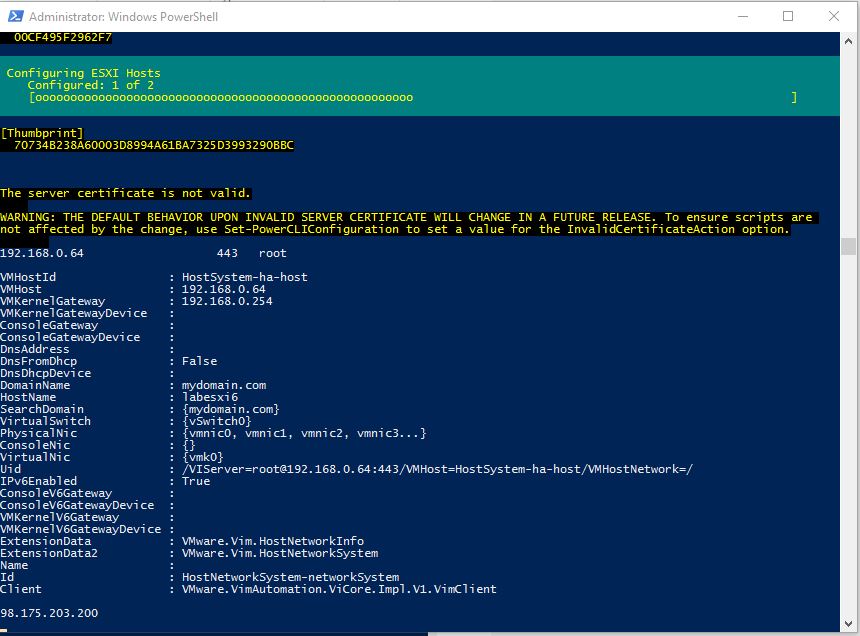
4. Now we will run this script against two hosts. First, let’s take a loot at the default network config of one of our sample hosts. This is a typical out of box ESXI configuration, with the first vSwitch0 attached to vmnic0.
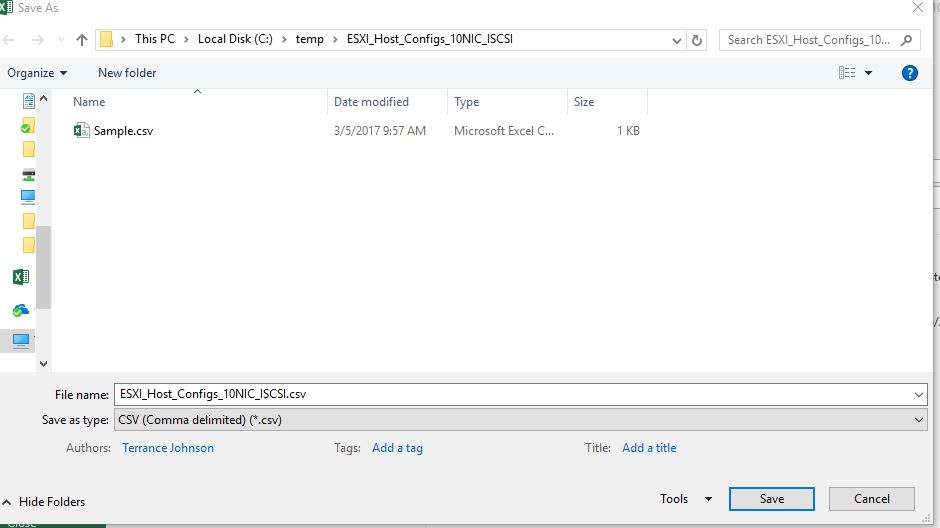
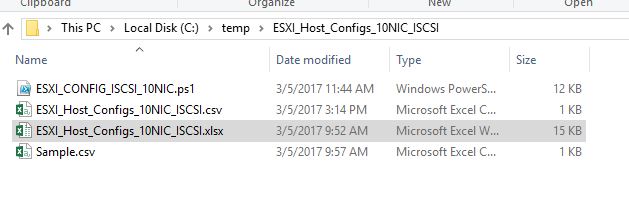
5. Now we will edit our excel document, (ESXI_HostConfigs_10NIC_ESCSI.xlsx), and save the file as a CSV file with the same name once complete. Don’t change the name of the file as the script is expecting the file to be named a certain way and in a certain location. ( Line 11 in the script. ) The screenshots below shows my sample excel file plus the file location that the file is saved to. You will get a prompt once you convert the file from .xlsx to .csv. Click yes to the prompt. The final screenshot shows the location of our files.


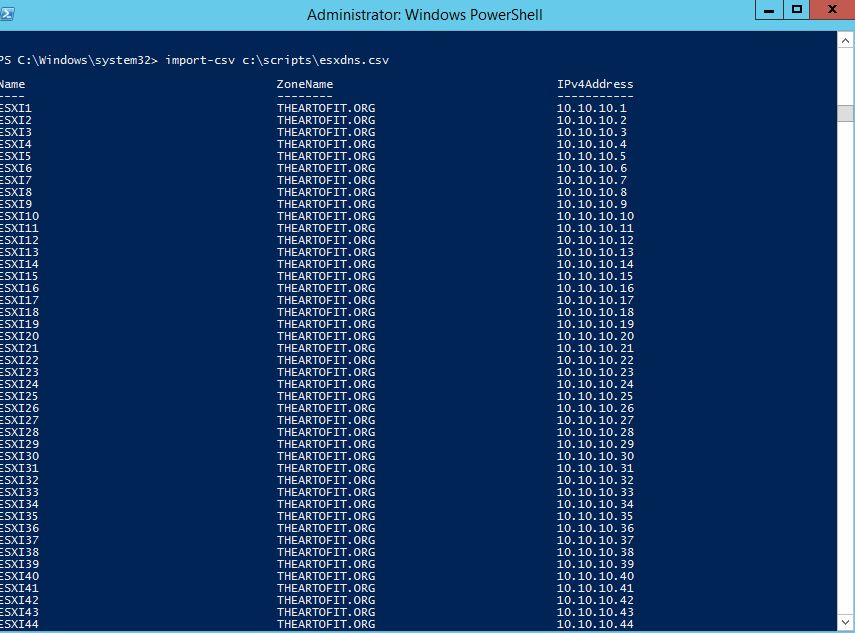
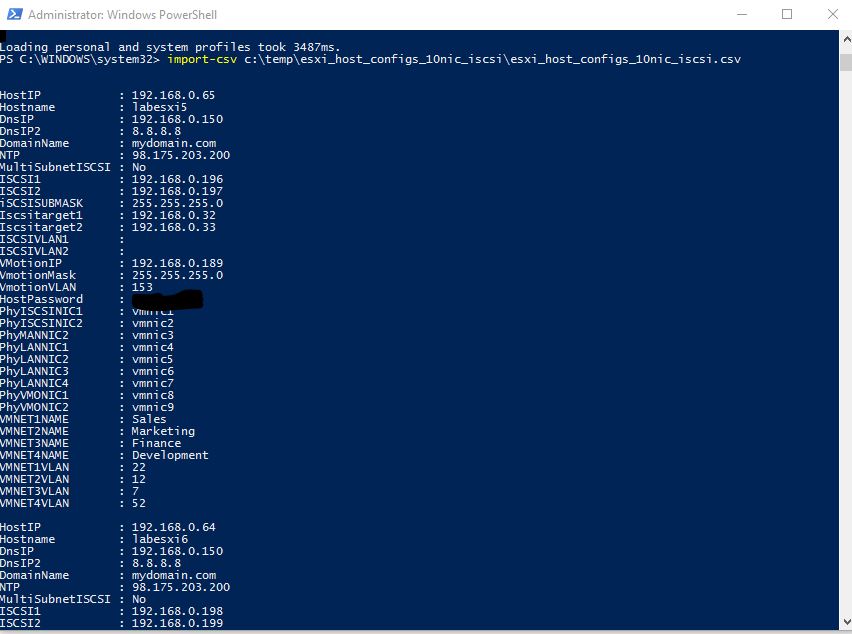
6. Now let’s open a PowerShell session. Run the following command to make sure we are reading the .csv file correctly. As we can see in the screenshot we are reading the file as expected.
import-csv c:\temp\esxi_host_configs_10nic_iscsi\esxi_host_configs_10nic_iscsi.csv
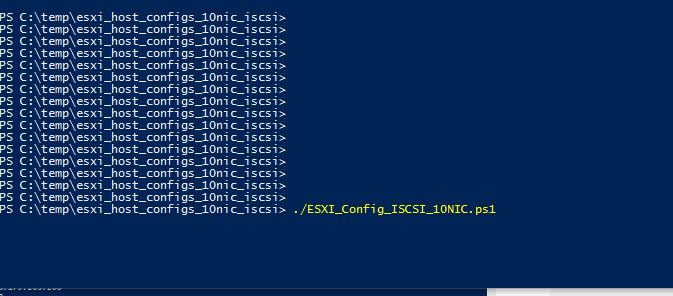
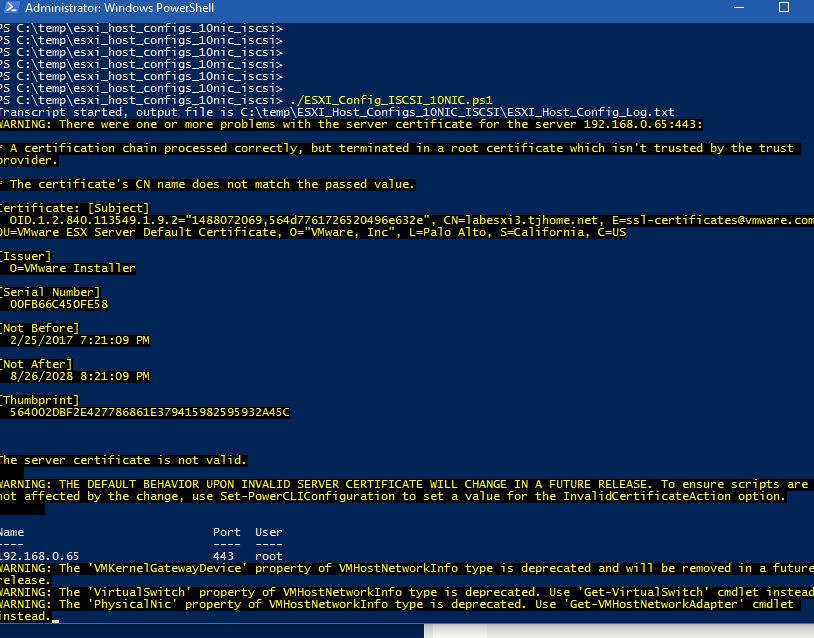
7. From the PowerShell window, browse to the directory that the script resides in. “C:\temp\esxi_host_configs_10nic_iscsi\”. Then run the following command to run the script. The screenshots below shows various stages of the script configuration.
./ESXI_Config_ISCSI_10NIC.ps1
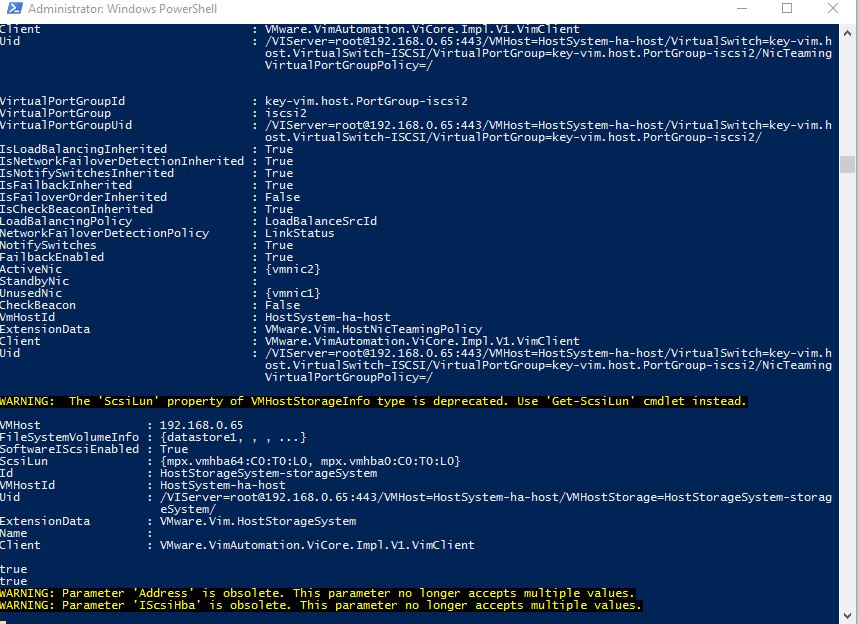
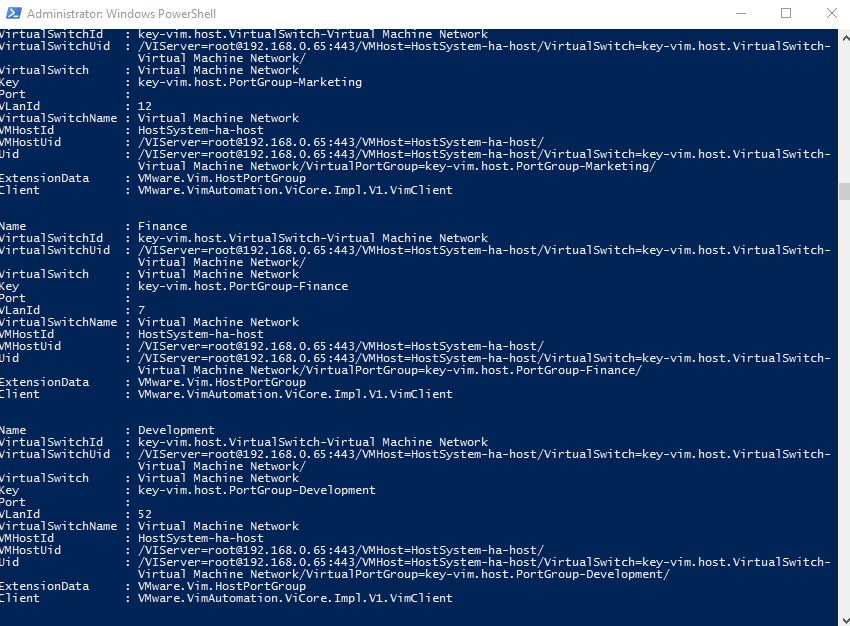
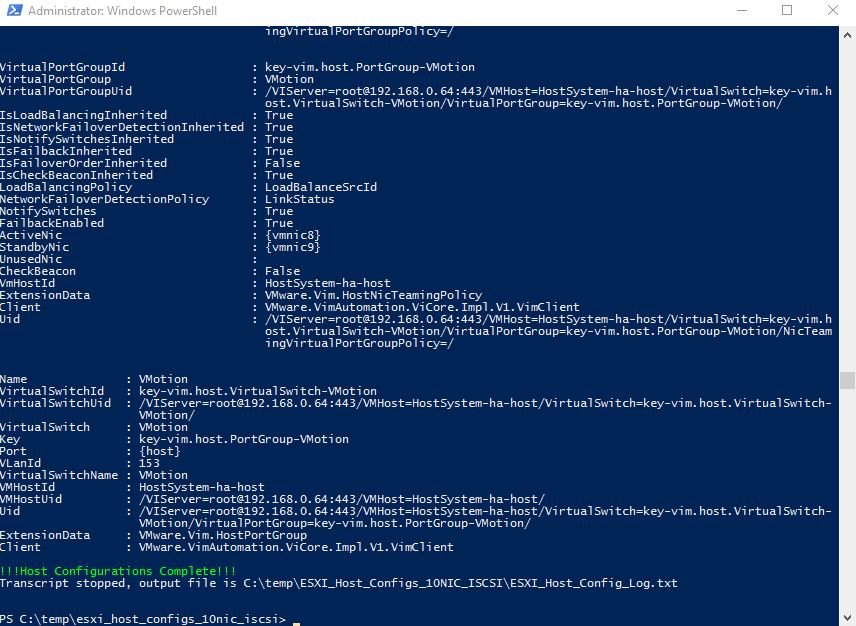
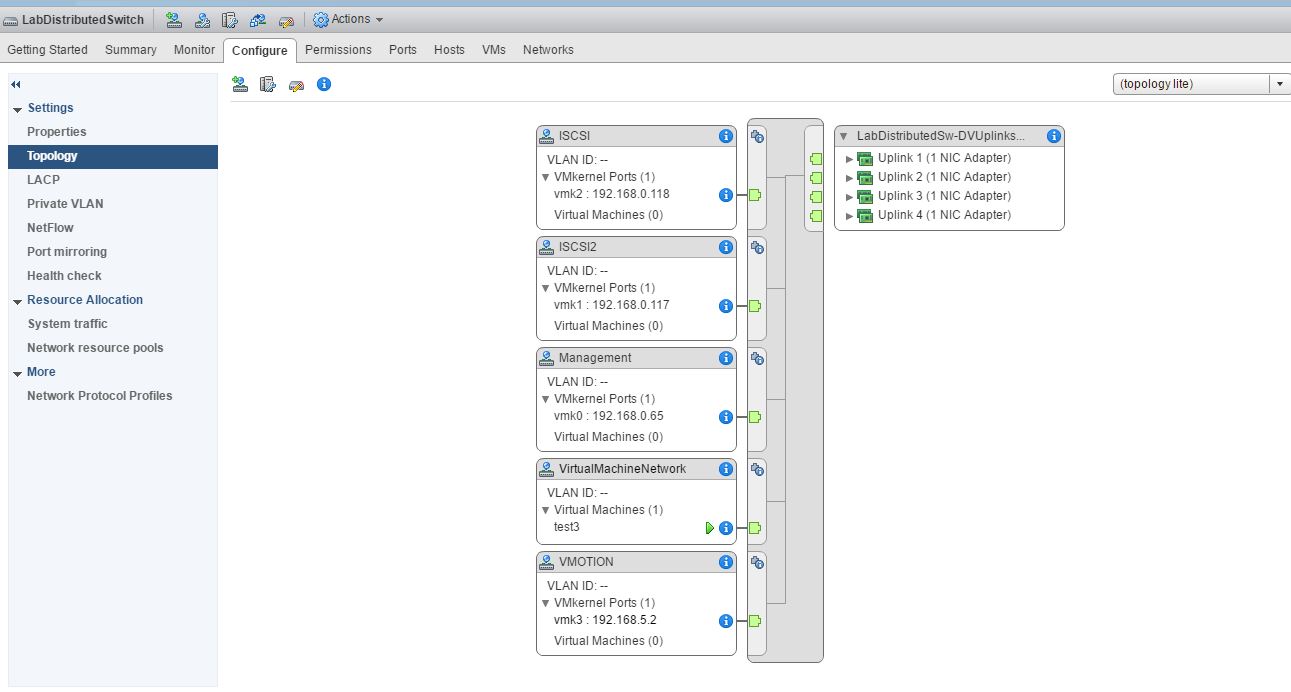
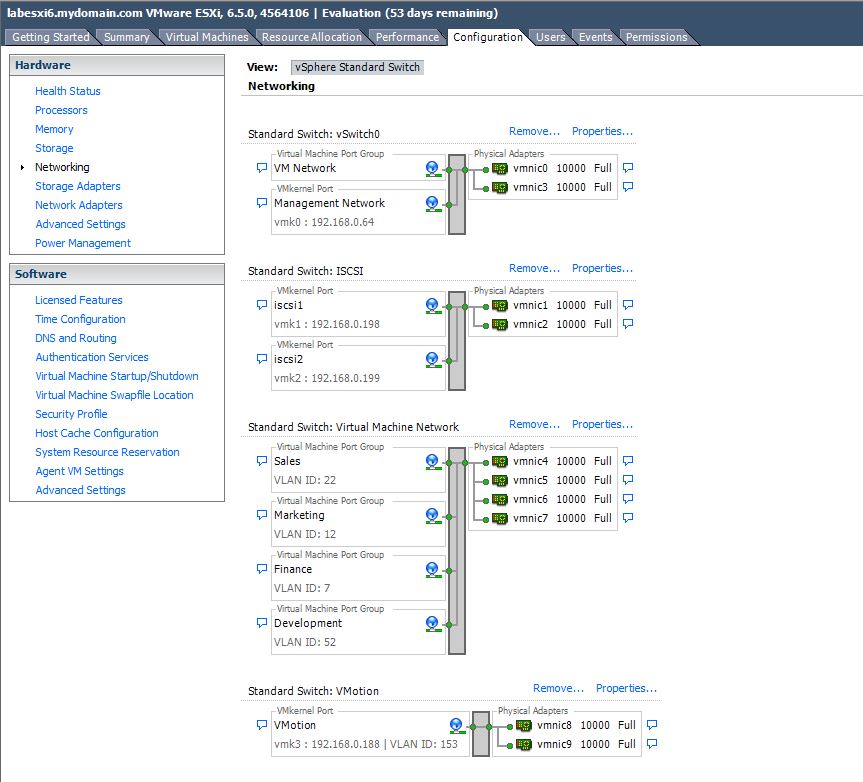
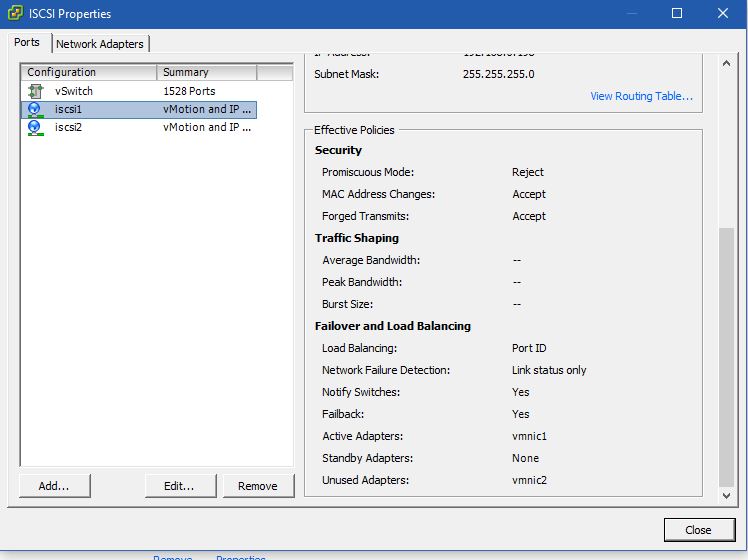
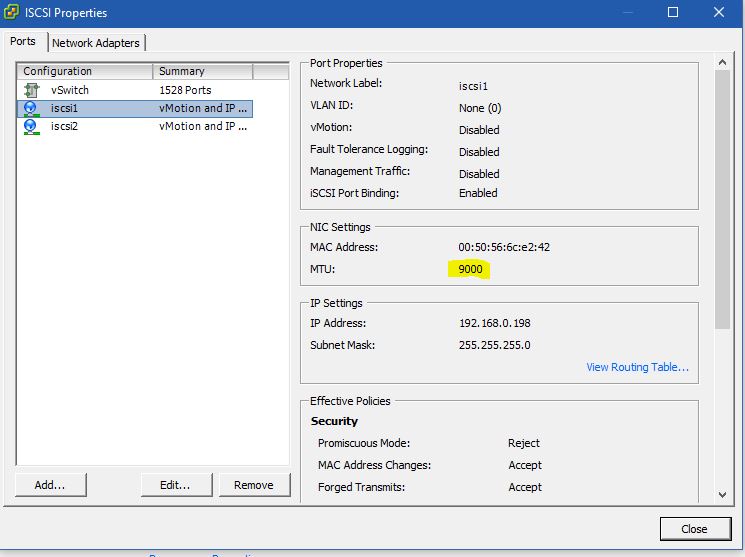
8. That completes our host configuration. Now let’s have a look at one of our hosts. We have fully configured Standard VSwitches. VLANs are configured for each virtual port group, network adapters are set up and teamed with the appropriate configurations. Best practices MTU sizes ( 9000 ) are configured for the ISCSI network.
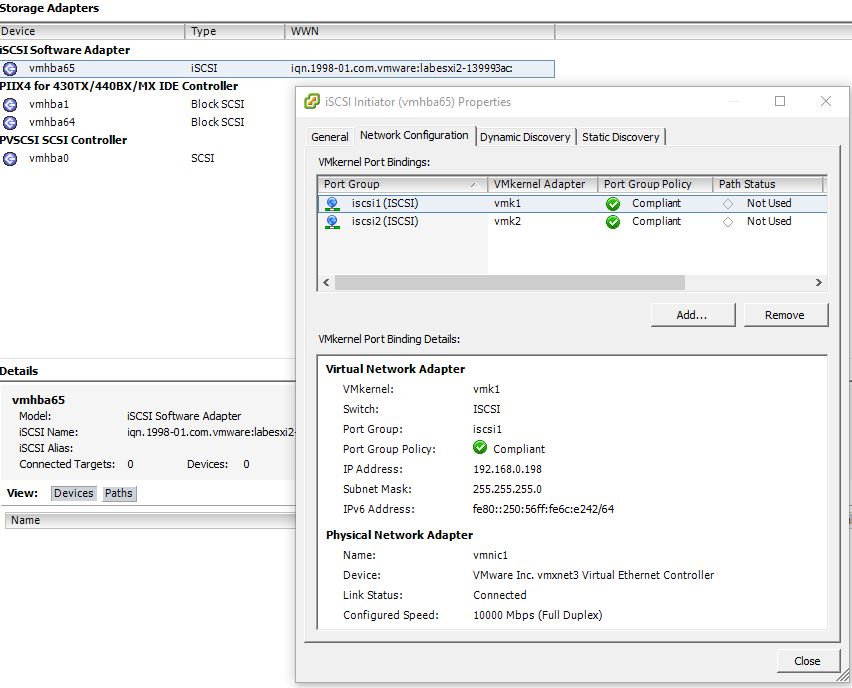
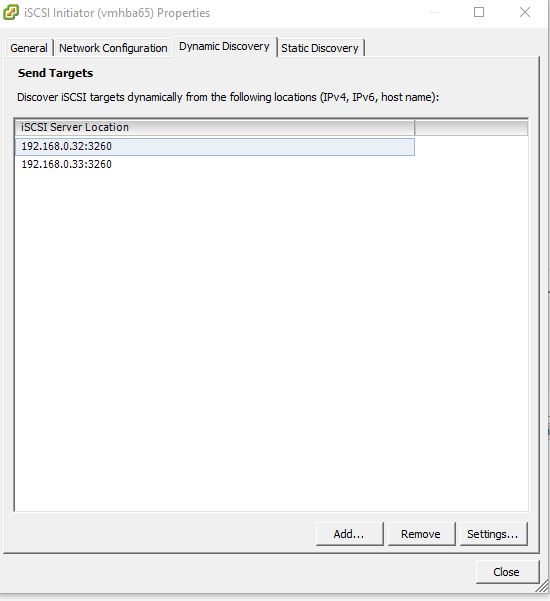
9. Now let’s take a look at the configuration of the ISCSI Software Adapter. Notice the port bindings are configured and compliant. If we look int the Dynamic Discovery tab, we can see that our SAN Targets are configured.
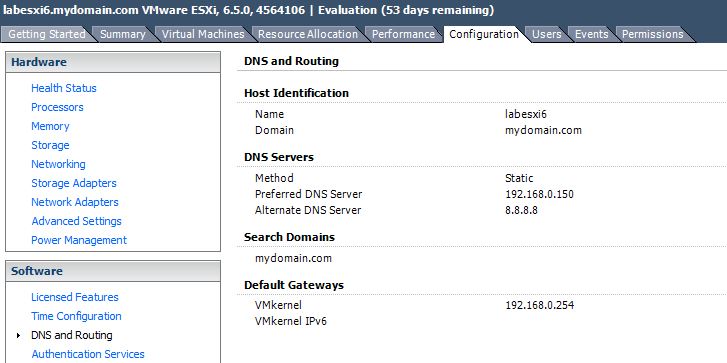
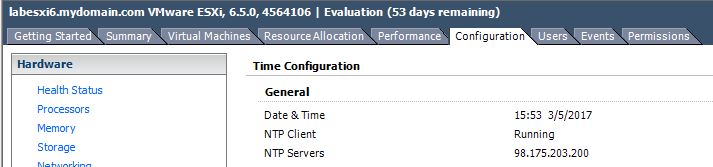
10. Checking the DNS and Routing tab we can see that our DNS information has been configured. We can also check the Time Configuration tab, to see that NTP has been fully configured.
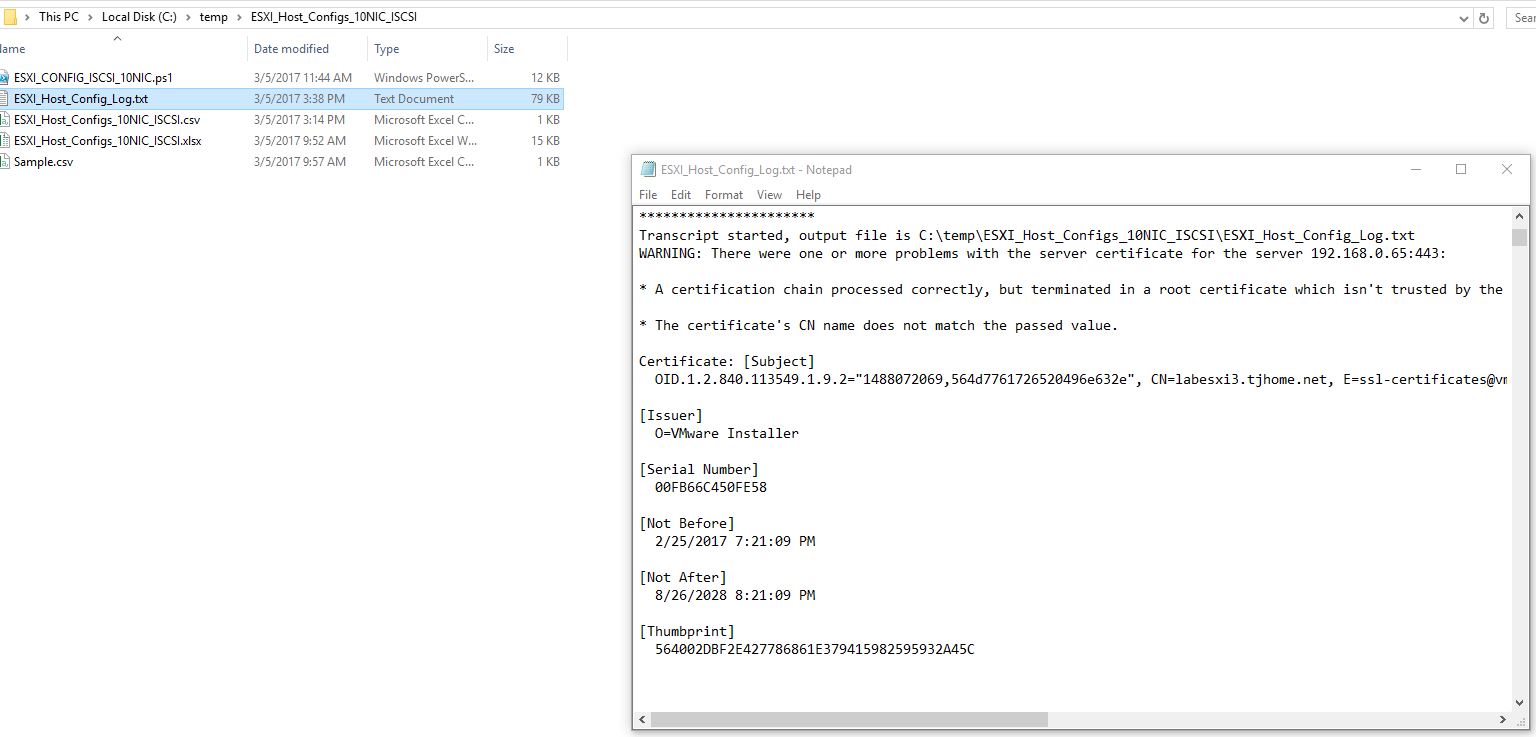
11. Finally, the entire session is logged in the file ESXI_Host_Config_Log.txt in the “C:\temp\ESXI_Host_Configs_10NIC_ISCSI” directory.
This completes this post on automating ESXI host configuration with PowerCLI. Remember that this post will be updated to reflect different server layouts with 8, 4 and 2 network adapters. We will also update posts that will include pure fiber channel options, essentially removing the ISCSI configuration. This method of automation should help to increase the deployment time of multiple ESXI hosts in environments not licensed for Host Profiles. This method can also allow consultants to send out pre-install docs to customers and also reduce deployment times. I hope you all found this post interesting and helpful. Until next time…