How to Migrate ESXI Host Networking to a Single Distributed Virtual Switch
This is a post about how to migrate an ESXI host that has multiple vSphere Standard Switches to a single vSphere Distributed Switch. If you’re licensed for vSphere Distributed Switches, they allow for easier management of virtual networking by simply being able to make changes on the single distributed switch they will be reflecting on all hosts. There are also other advantages including Network I/O control and LACP support. Check out the following VMware article for a full overview of comparisons between vSphere Standard Switches and vSphere Distributed Switches.
Overview of vNetwork Distributed Switch concepts
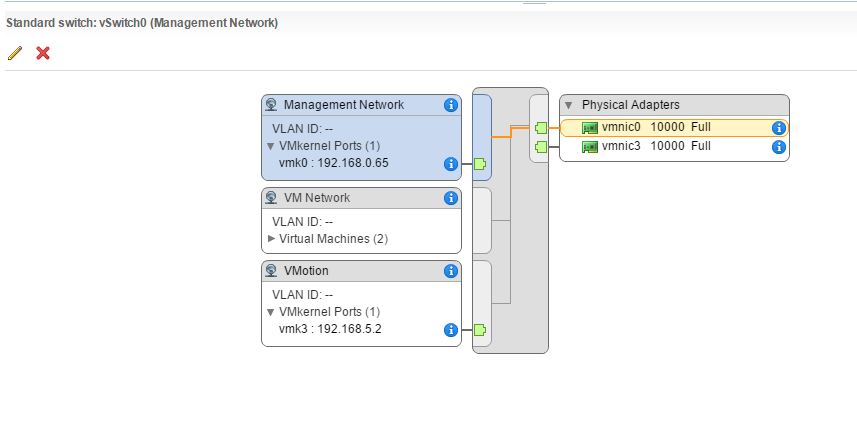
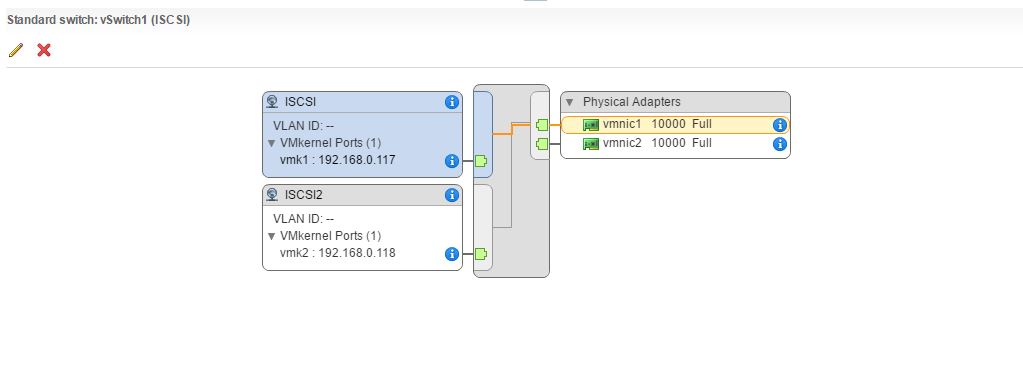
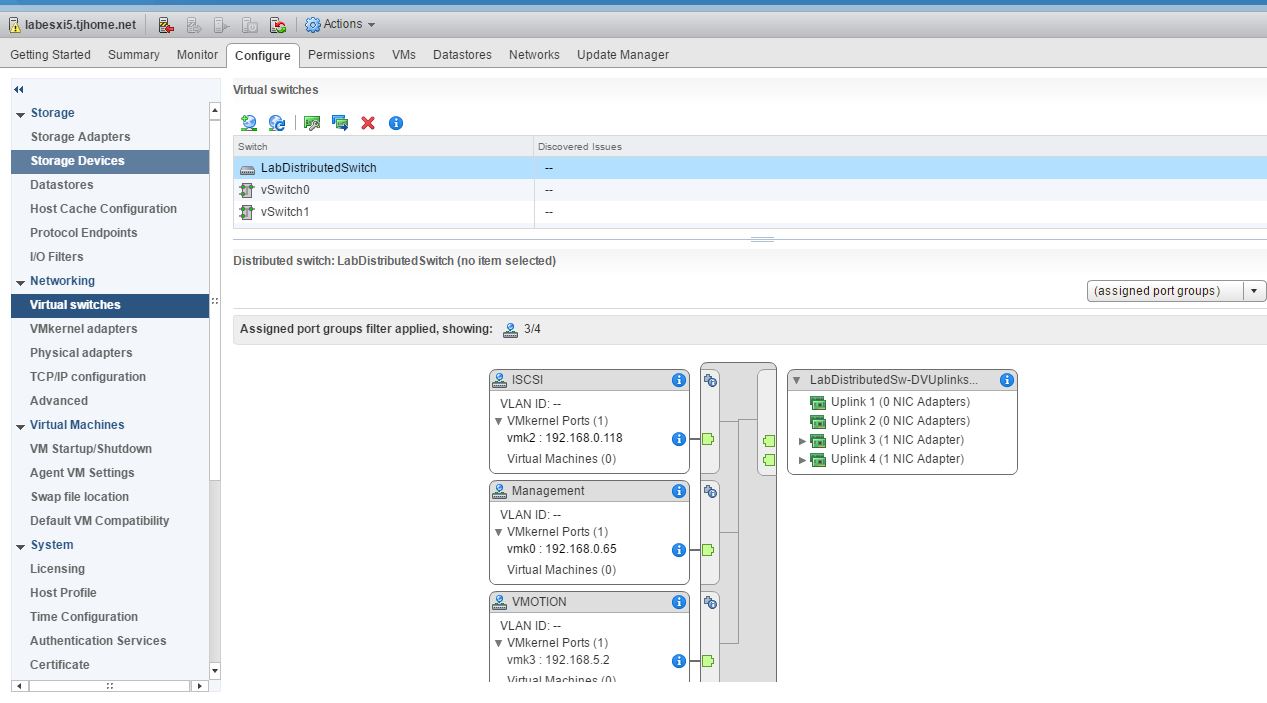
Current Standard vSwitch Design
In this post we will migrate a host that has four network adapters with two vsphere standard switches. vSwitch0 contains the management network vmkernel ports, vmotion vmkernel ports and the virtual machine network port groups. vSwitch1 is configured for single VLAN ISCSI connectivity. See screen shots below.
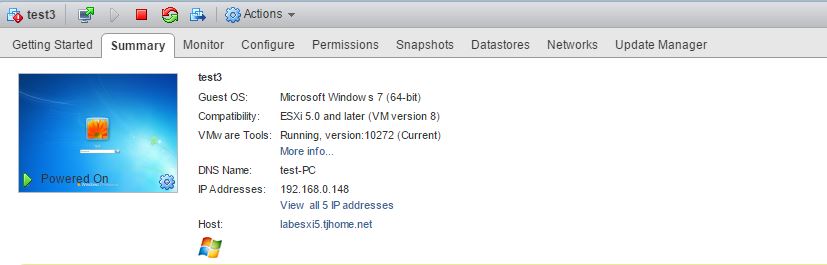
Also our host has one running VM that is connected to the ISCSI storage. The VM will not loose connection during the migration to the distributed vSwitch.
Now we will go through the process of migrating our host to a single distributed switch.
Build the Distributed Switch
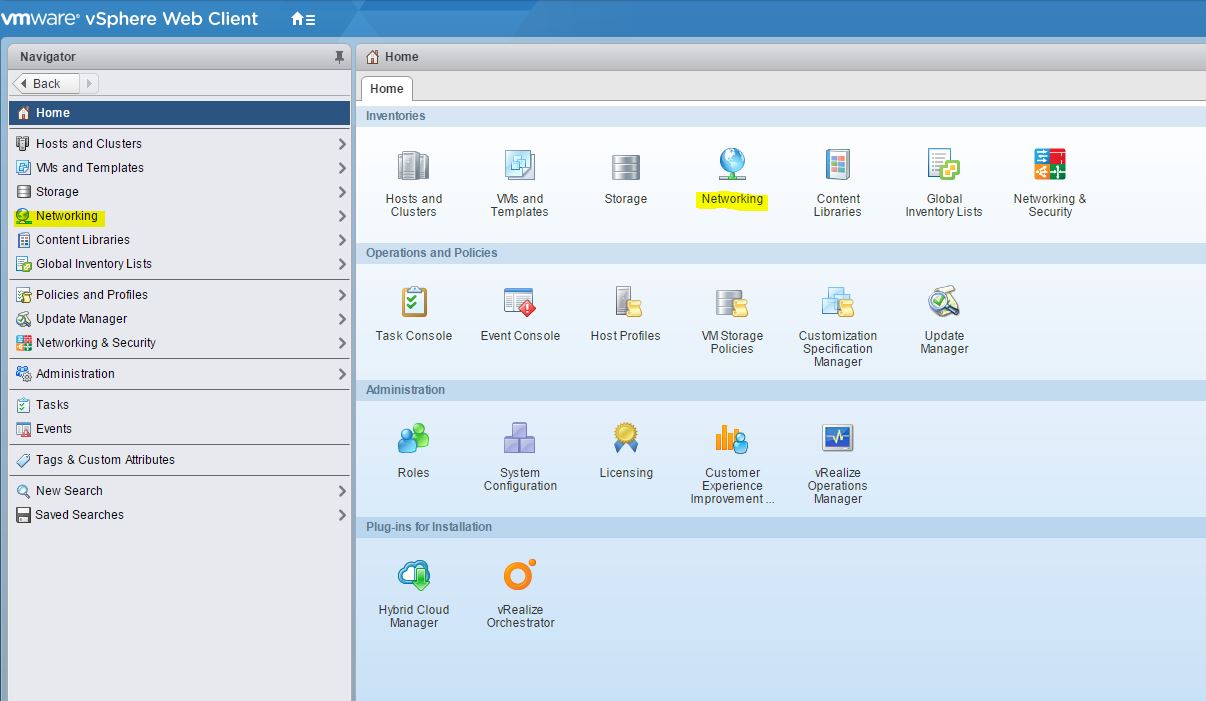
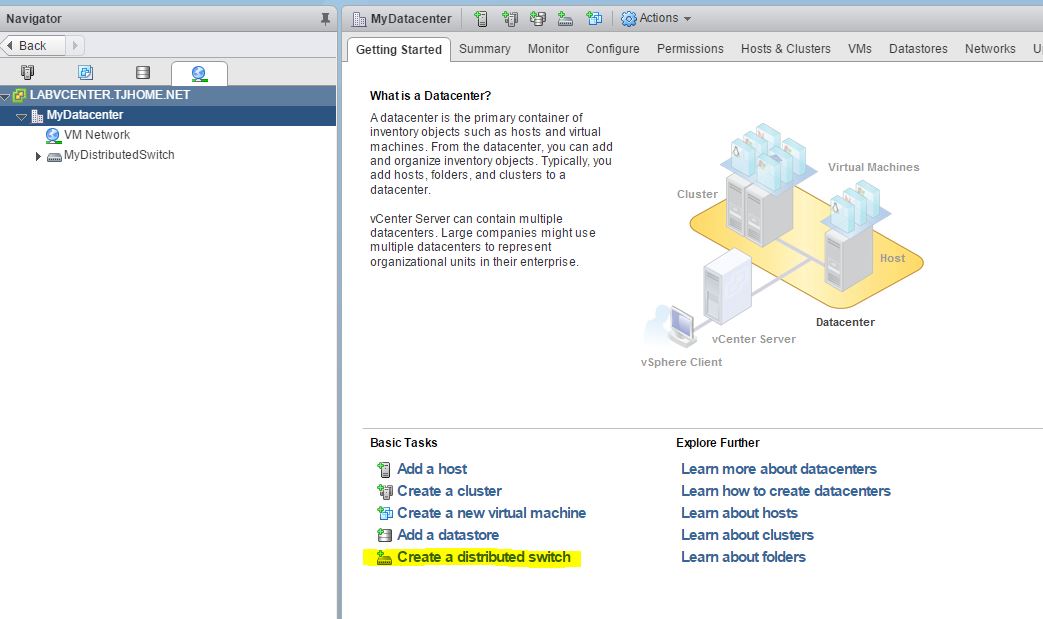
1. Log in to the VCenter Web Client. Go to the “Networking” Page within the VSphere Web Client.
2. From the networking page click on “Create a distributed switch.”
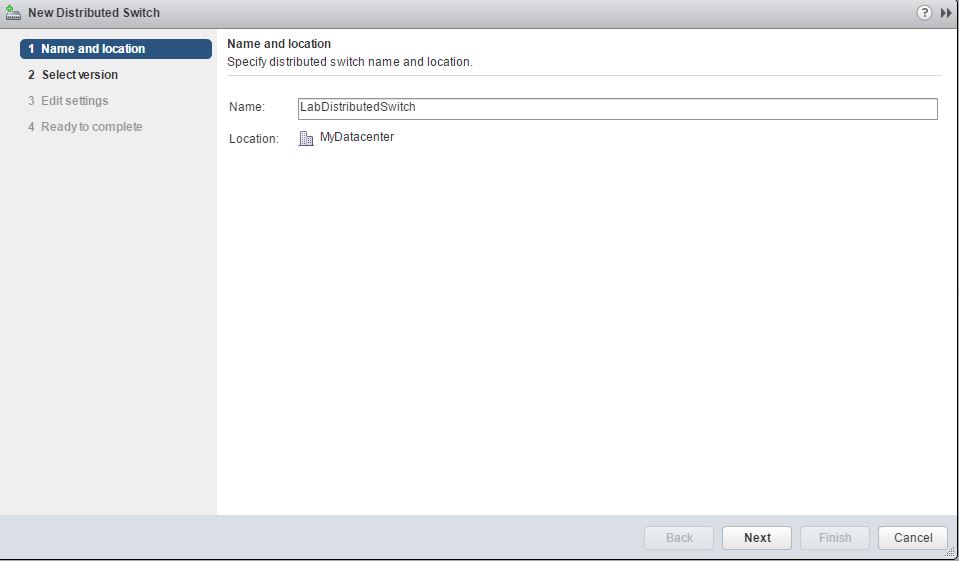
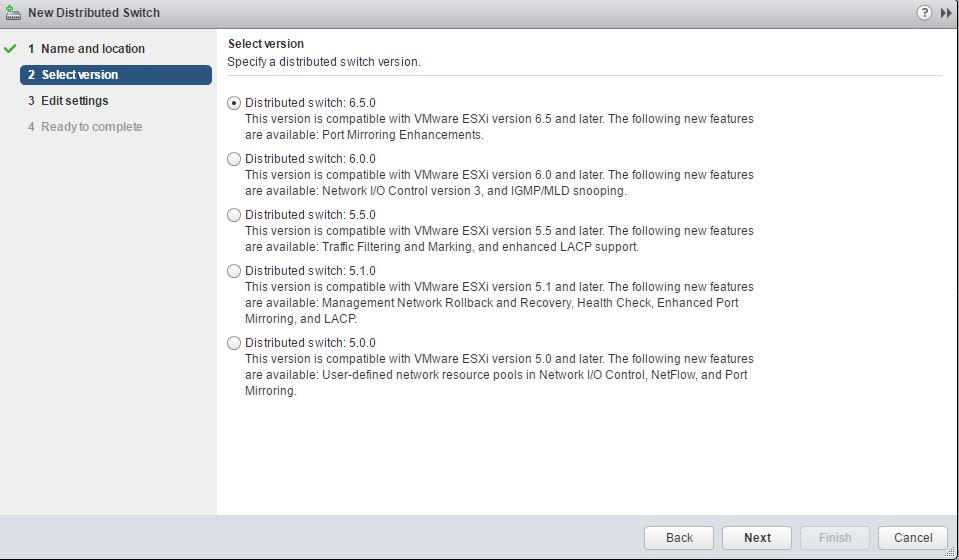
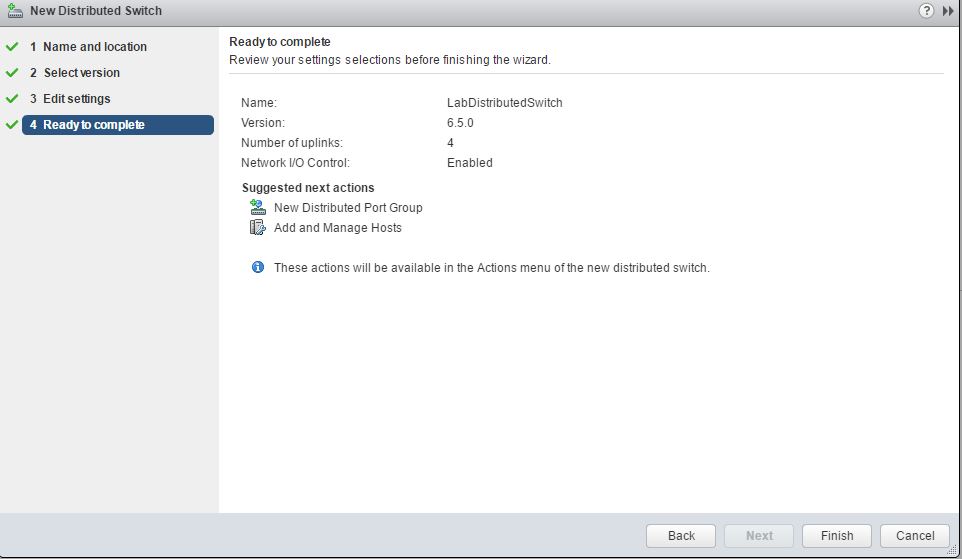
3. Name your Distributed Switch. ( LabDistributedSwitch in this example. ) Select your distributed switch version. ( Use the version that is compatible with your version of vCenter. )
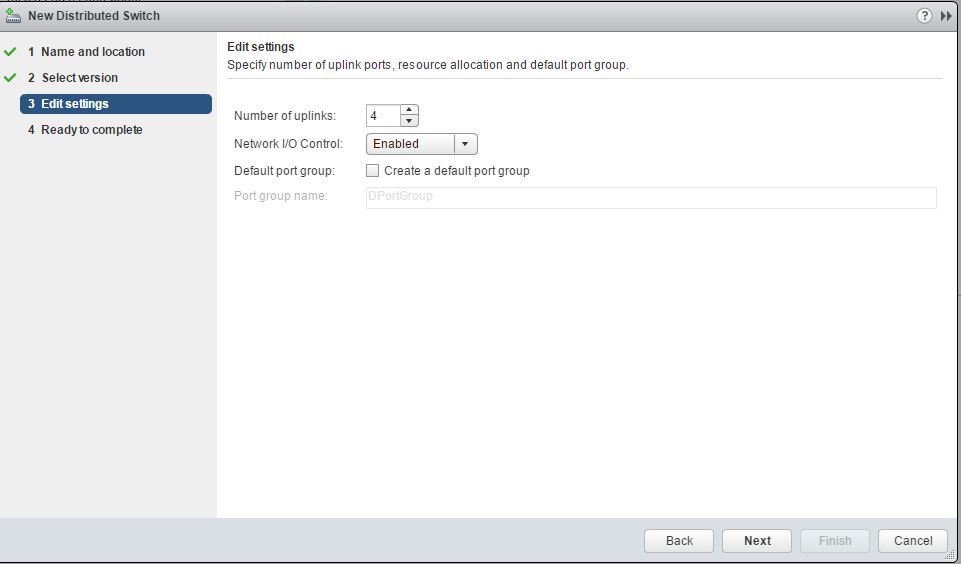
4. Specify the number of uplinks that you will use with your distributed switch. The number of uplinks should typically match the number of physical adapters that exist within your ESXI host. Since our host has 4 adapters, we will use 4 uplinks. Leave Network I/O Control enabled to take advantage of this load balancing feature of distributed switches. However, “uncheck” “Create a default port group”. We will create our port groups later. Click “Next” and click “Finish” to complete the process.
Build Port Groups on Distributed Switch
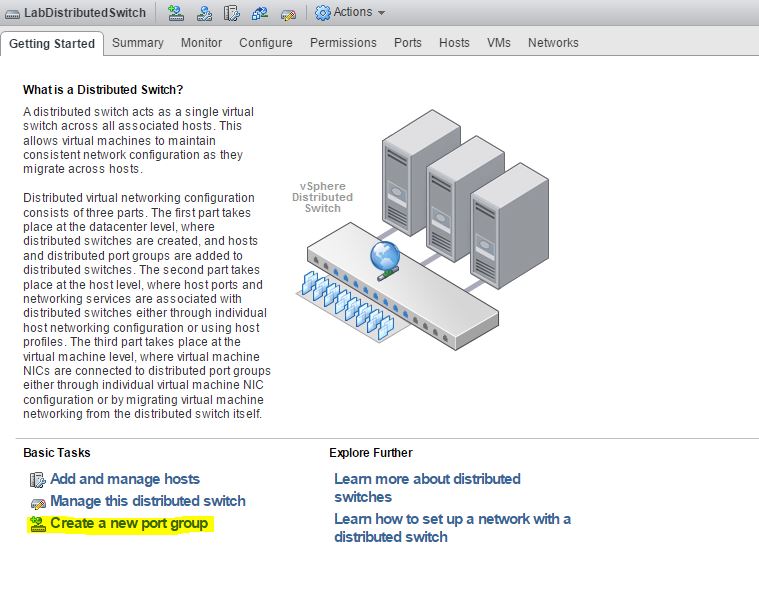
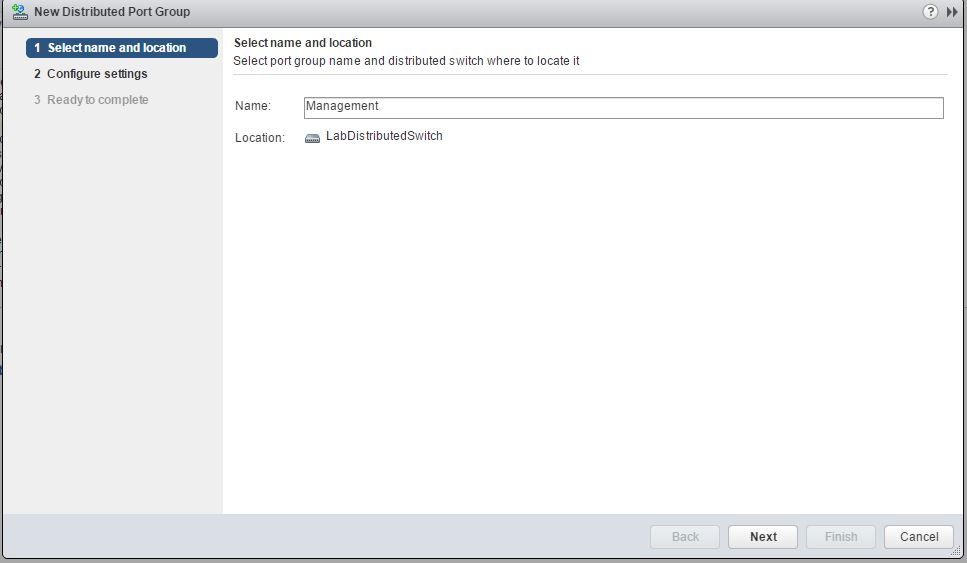
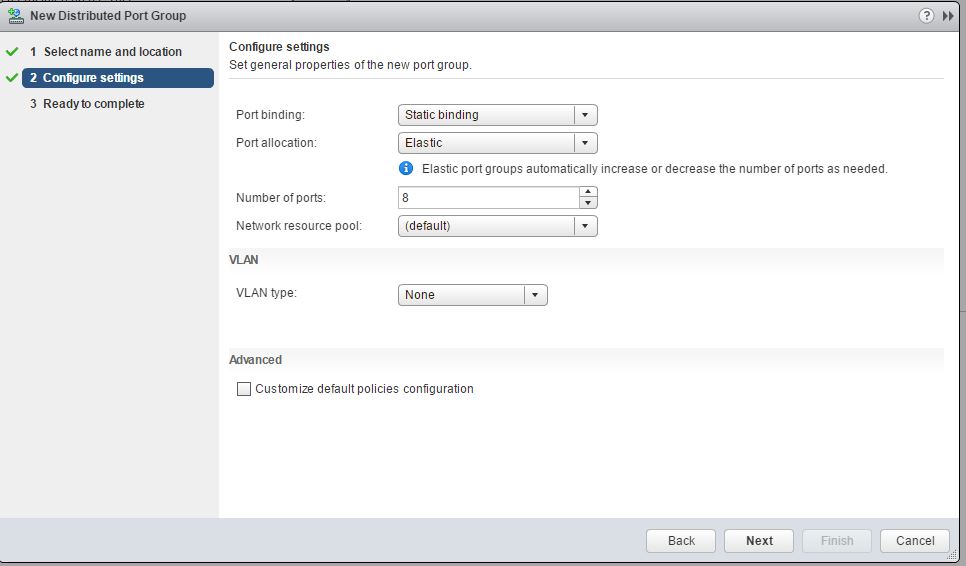
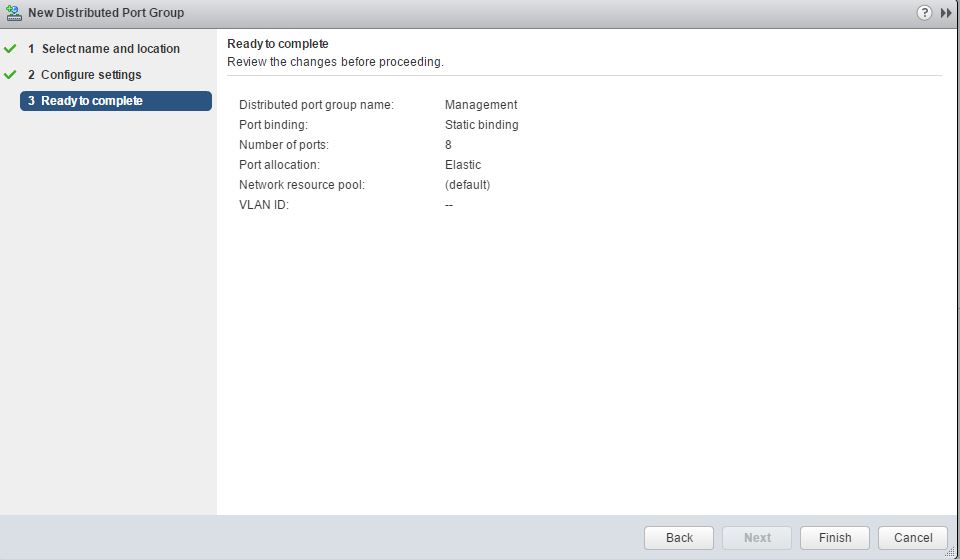
1. On the Getting Started Page for our newly created dvswitch, select “Create a new port group”. We will create a Management Port Group, so give the port group a name and click “Next”. On the next screen, you will see a number of settings. Typically the only settings that may need to be modified here are the VLAN setting. So specify this setting for your management VLAN or leave as none if the VLAN is untagged. Click “Next”. And click “Finish” to complete building the port group.
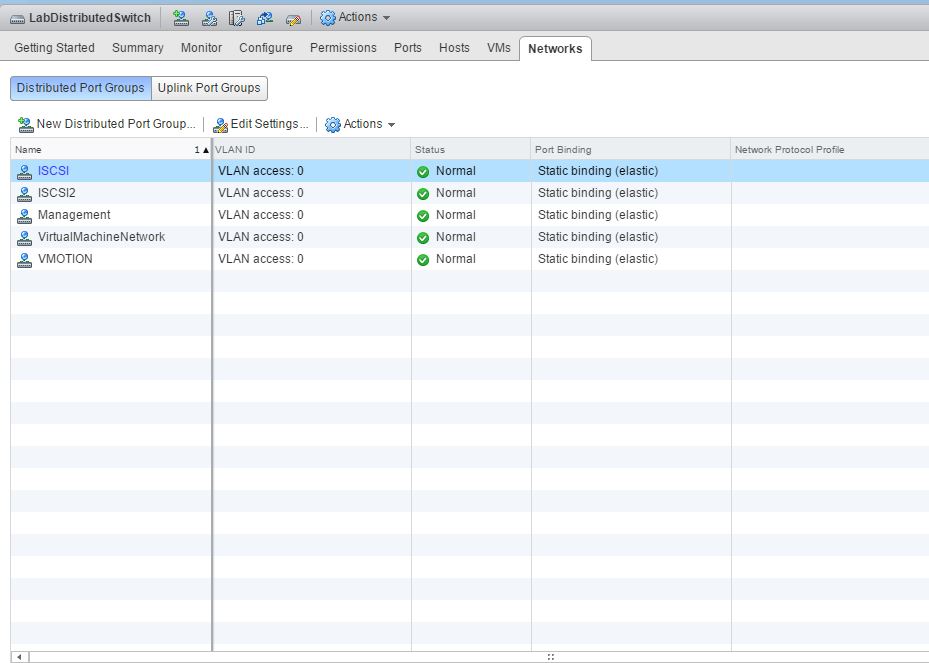
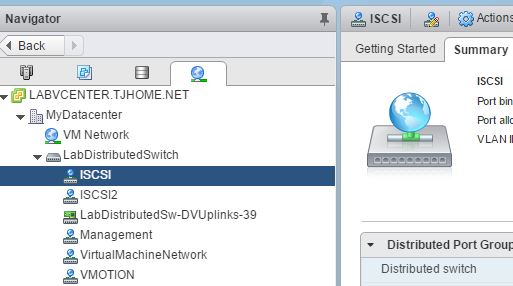
2. Follow the same exact steps in Step 1 to create port groups for VMotion, ISCSI, ISCSI2 and your virtual machine networks. Again, the exact same steps, but just specify a different name and VLAN if required for each port group. The screenshot below shows all of the port groups I created for this distributed switch.
Remove ISCSI port bindings and from Standard vSwitch
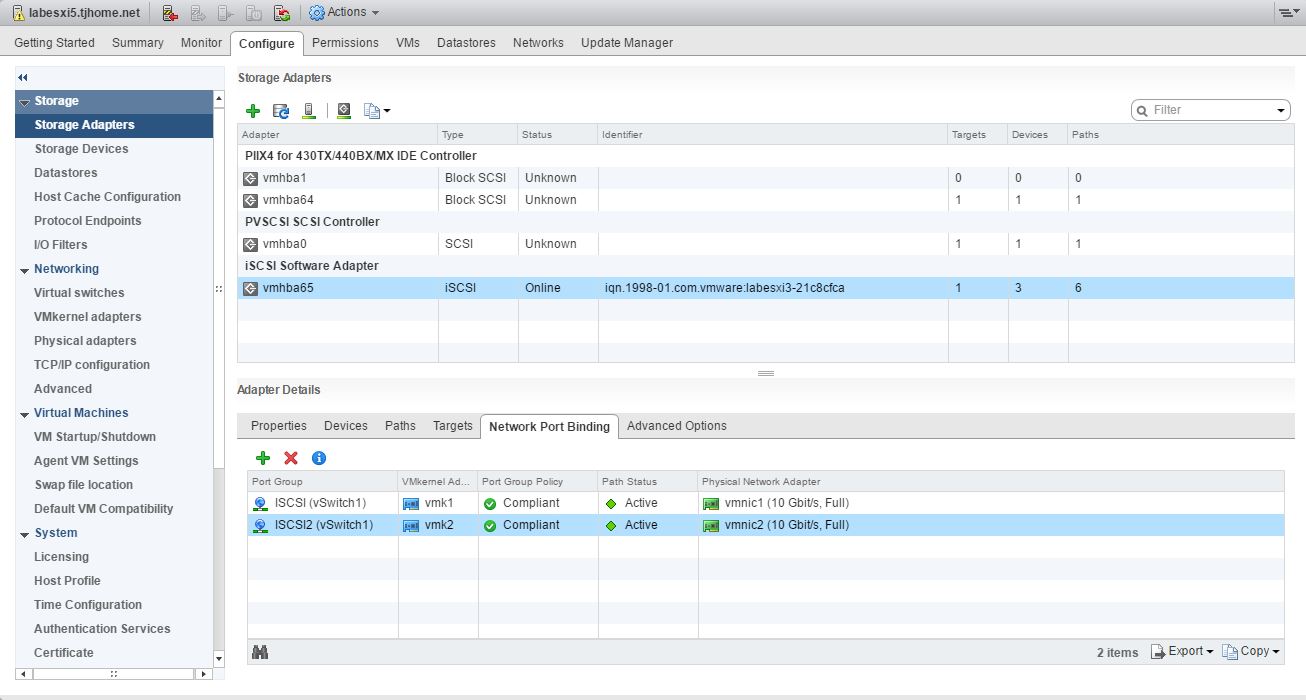
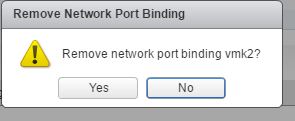
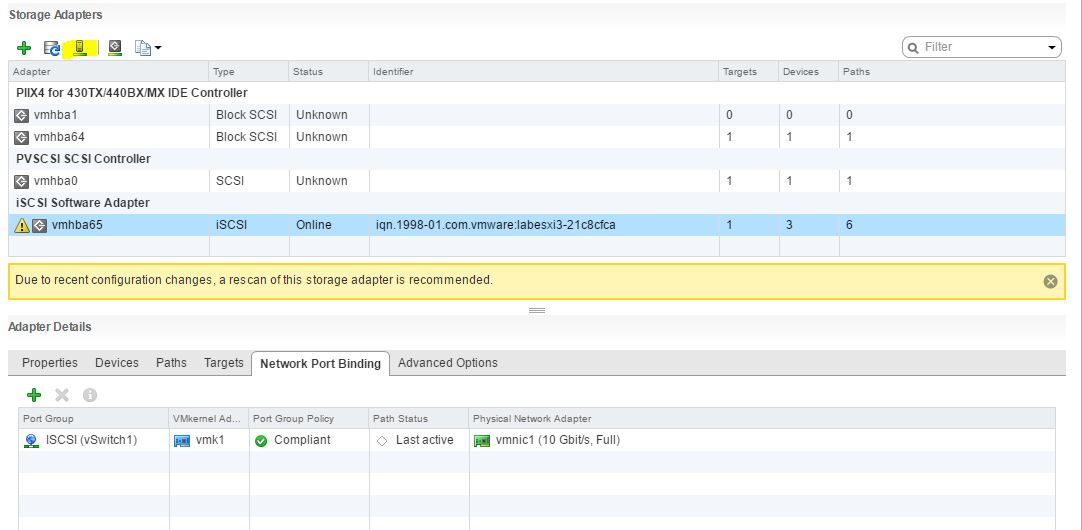
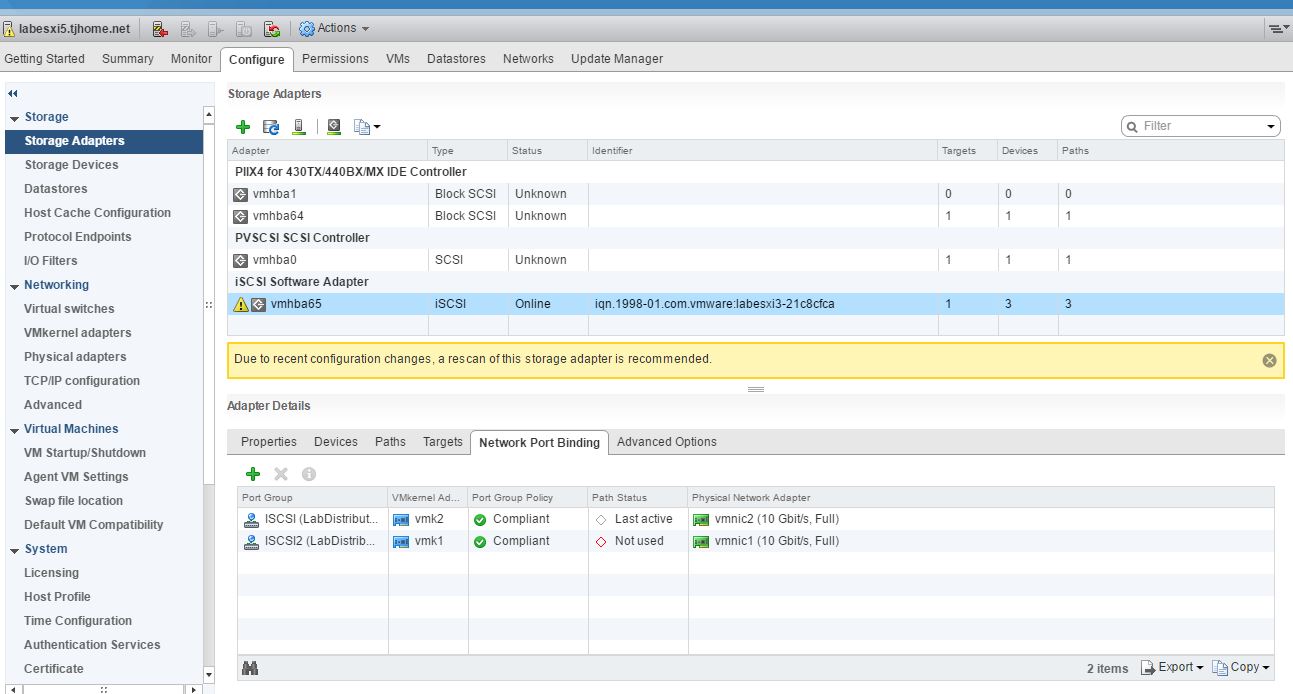
1. Now since we are using ISCSI, we will first need to remove one of the ISCSI adapters being used for port bindings. Since we have two initiators or ISCSI vmkernel ports, we can do this with no downtime. From the Hosts and Clusters View, Go to “Storage Adapters” under the “Configure” tab go to “Network Port Binding”. Click the “X” button to remove the port binding for the second “ISCSI2” port group. Click “Yes” when asked if we want to “Remove network port binding vmk2”. ONLY DO THIS FOR ONE ADAPTER. We will remove the other one later.
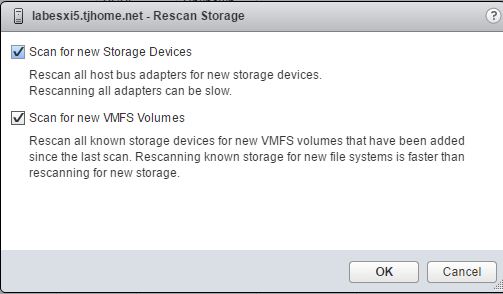
2. You will see a warning to perform a rescan of the storage adapter. Click the rescan button to do a rescan of the software ISCSI initiator. Click OK and the rescan will proceed.
Add Hosts to Distributed Switch
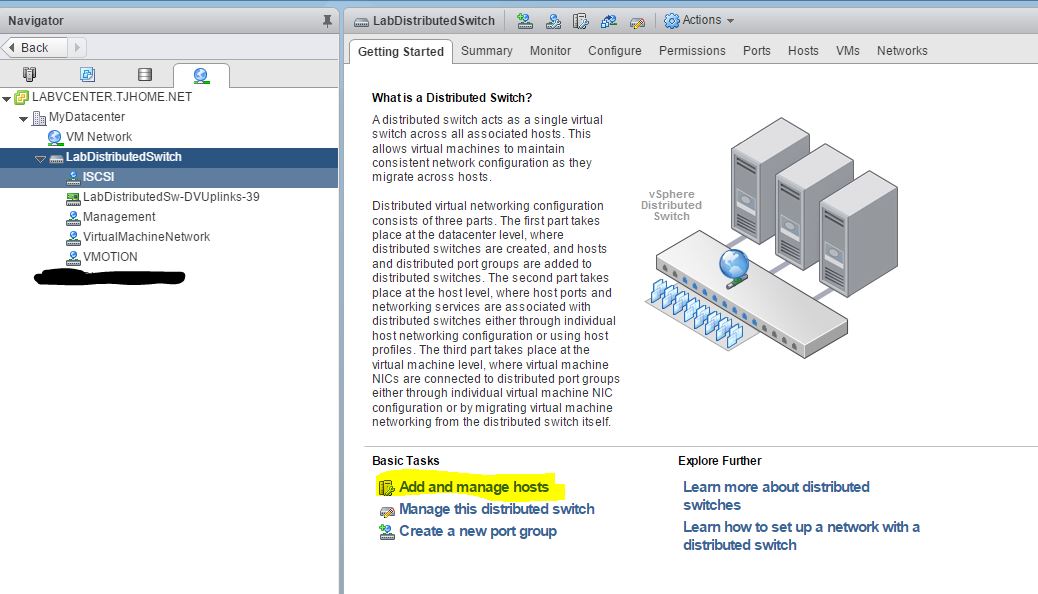
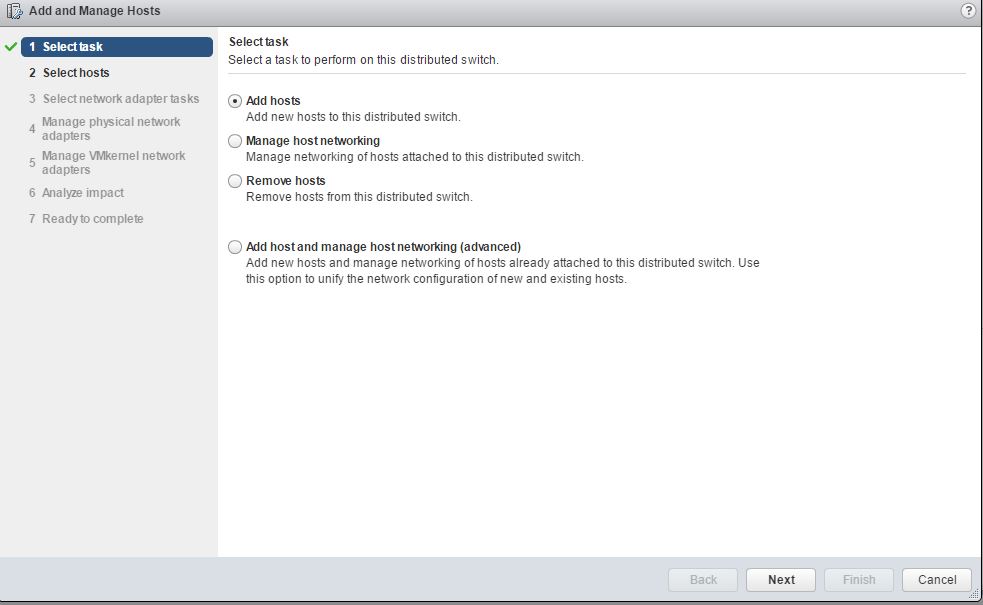
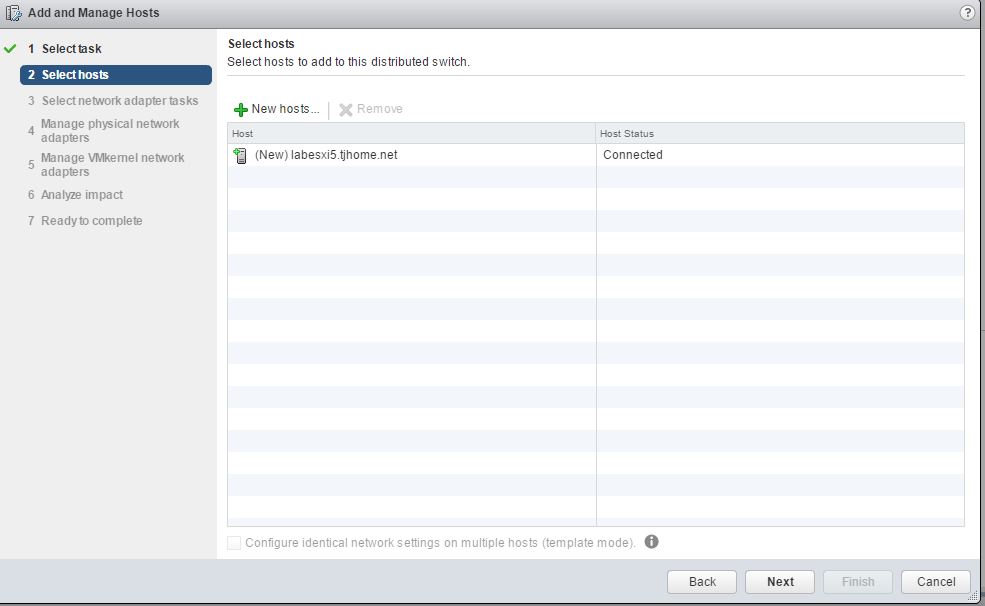
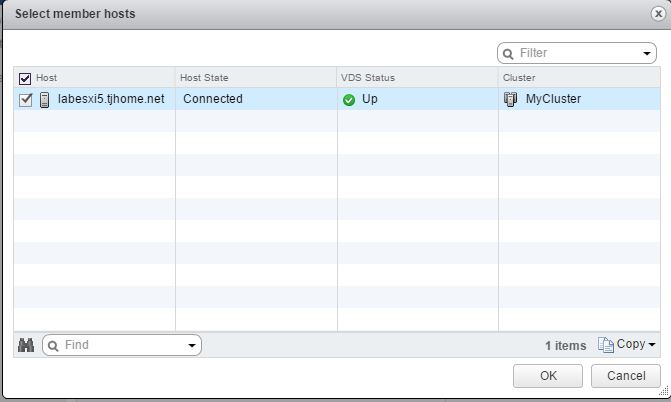
1. Going back to our Networking screen. With your distributed switch highlighted in the left hand pane. Go ahead and click on “Add and manage hosts” from the Getting Started Screen. Leave “Add hosts” selected and click “Next”. Click the “+New hosts” tab and add your host. Click “Next”.
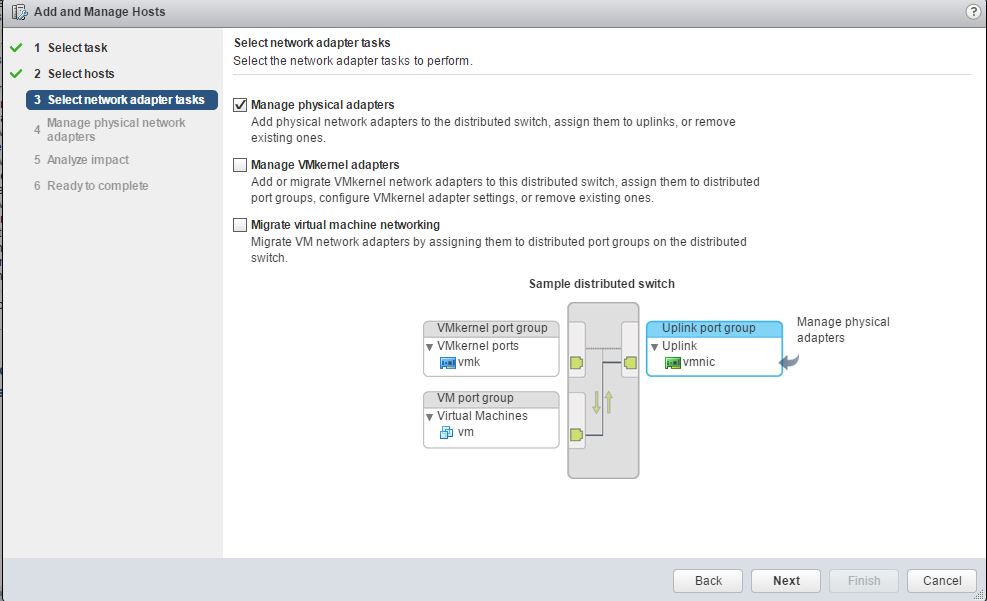
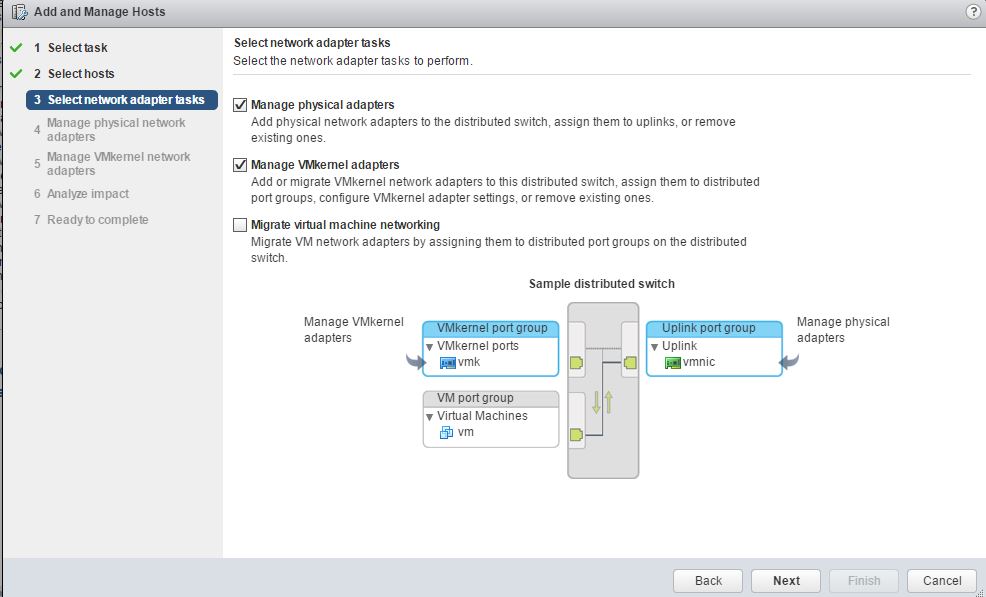
2. Right now we just want to “Manage physical adapters”. So uncheck “Manage VMkernel adapters” and click “Next”.
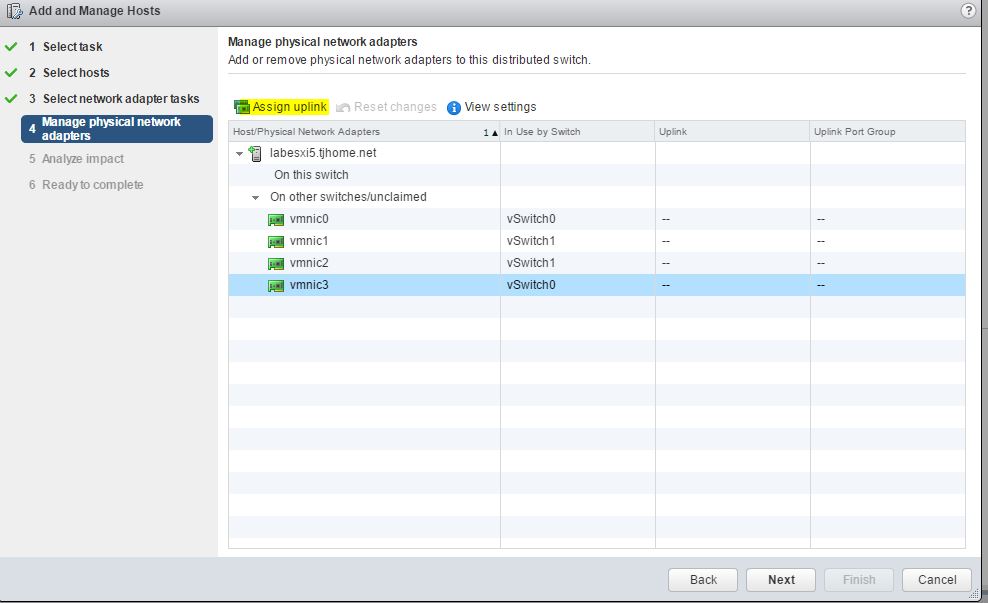
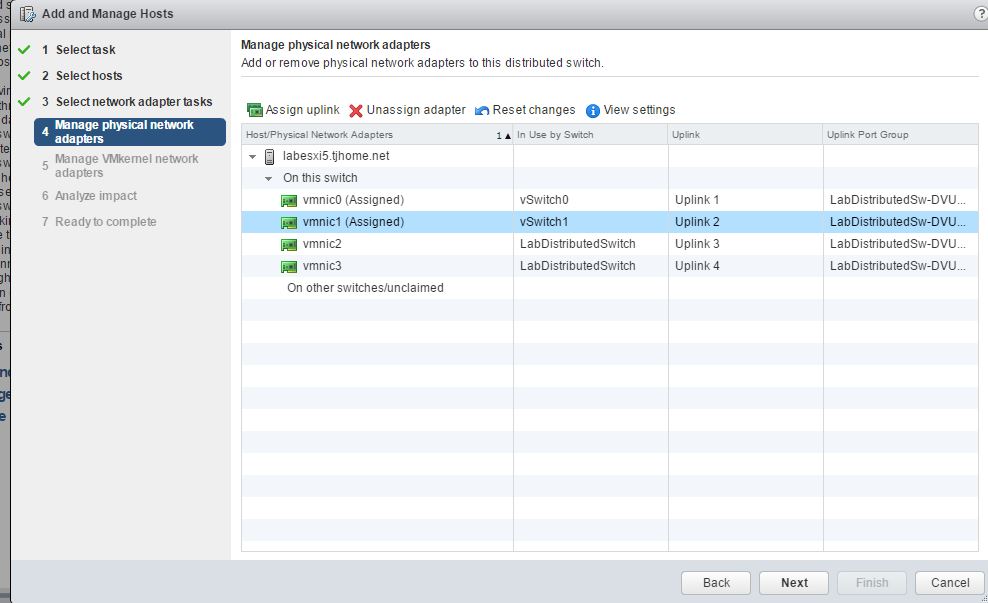
3. Ok, here’s where things can be a bit tricky and we have to be careful. First recall, that our host have vmnic0 and vmnic3 associated with the first vswitch that have our management, virtual machine and vmotion networks. ( Refer back to the very first screenshots in this post if needed. ) vmnic3 is basically the standby adapter. Also recall that vmnic1 and vmnic2 were being used for the ISCSI vswitch. Since we have redundancy, for each vswitch, we will go ahead and associated vmnic3 and vmnic 2 to our new distributed vswitch. But we will only move these two physical network adapters at this time and not all physical network adapters. So we will associate vmnic3 with uplink 4 on the distributed vswitch and vmnic2 with uplink 3 on the distributed vswitch by performing the following steps. Again, some of these changes will depend on your environment, but the idea is to have physical adapters on both the old standard vSwitches and the new distributed vSwitch in order to move VMs and vmkernel ports without downtime.
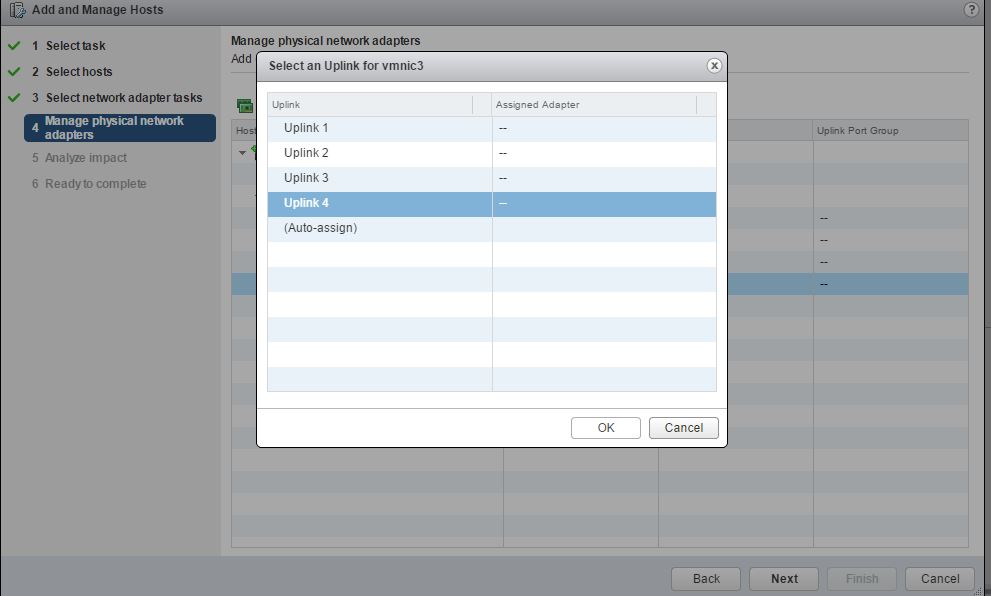
4. Click on vmnic3 and click “Assign Uplink” Select “Uplink 4” and click “OK”. Perform the same step for vmnic2 and assign it to Uplink 3. When you have both vmnic’s assigned, click “Next”.
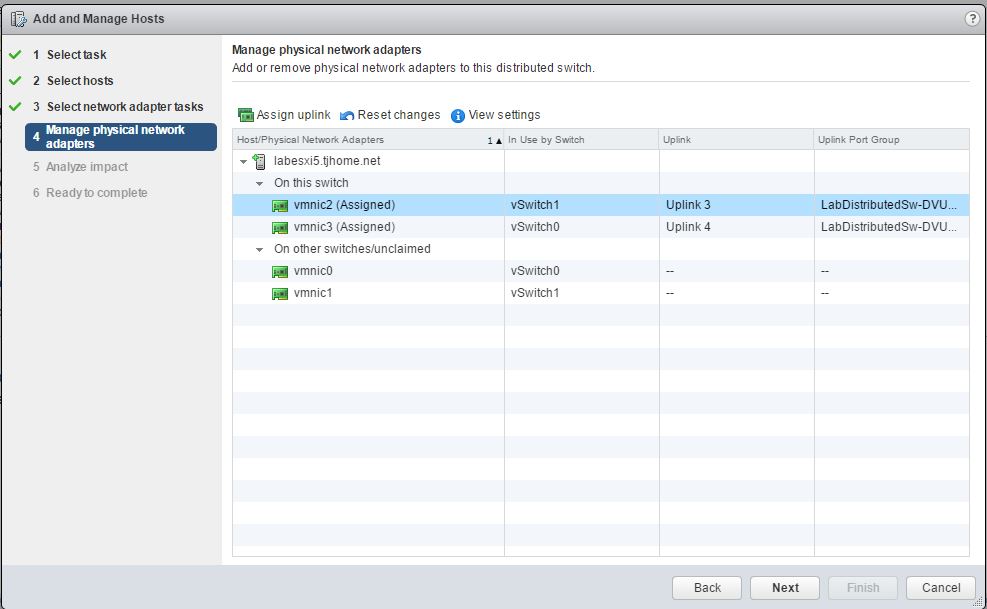
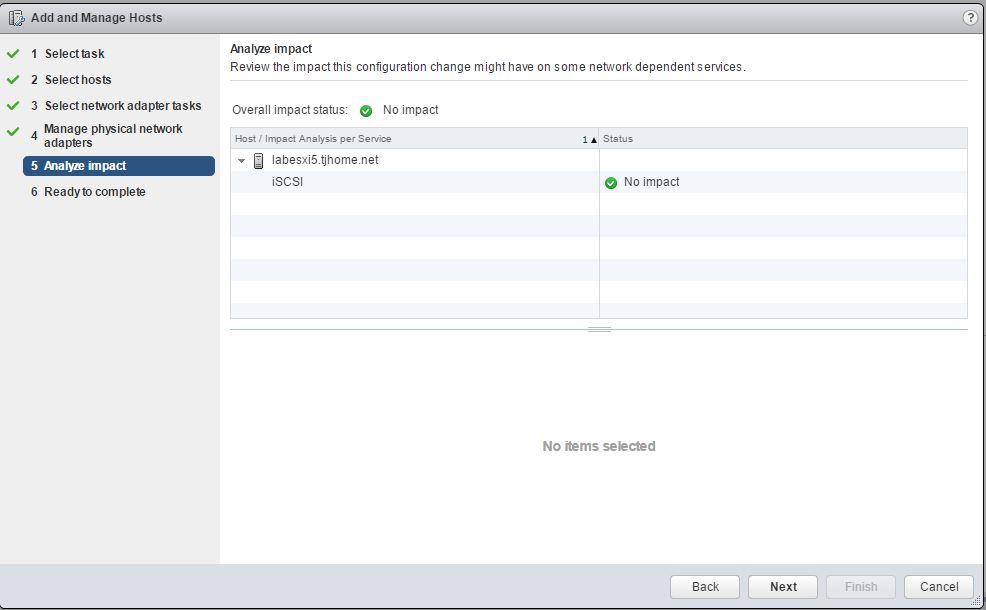
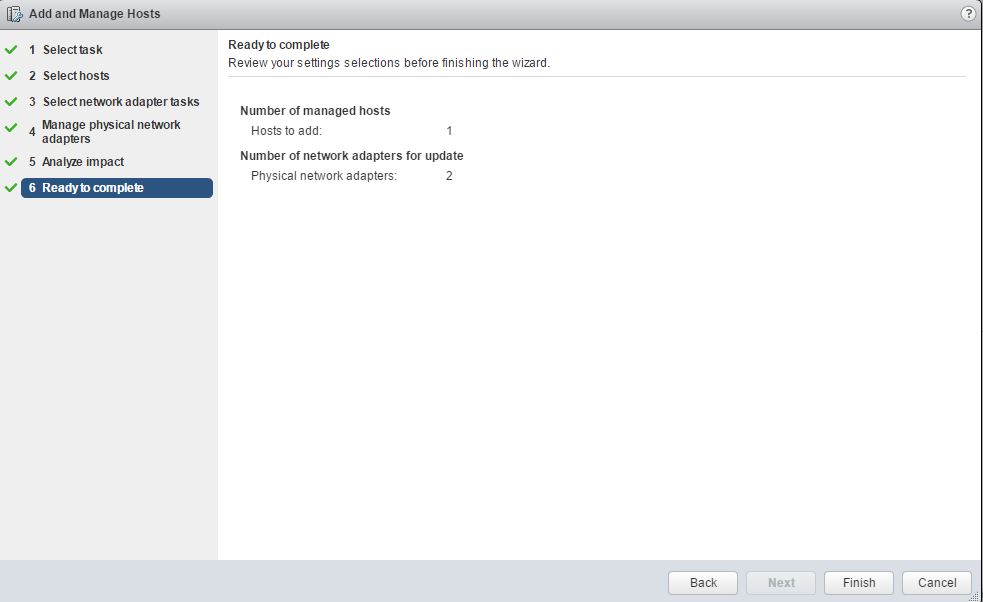
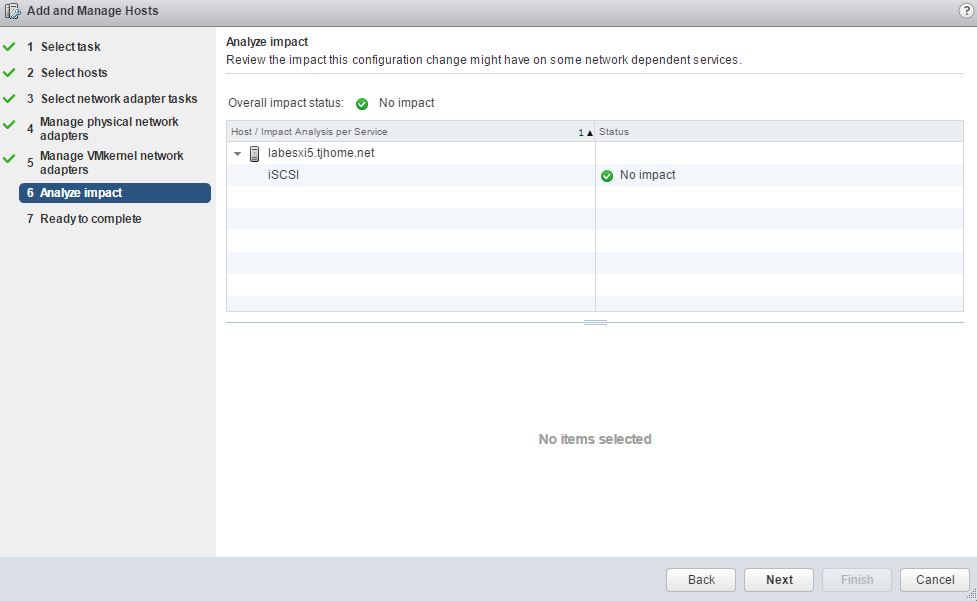
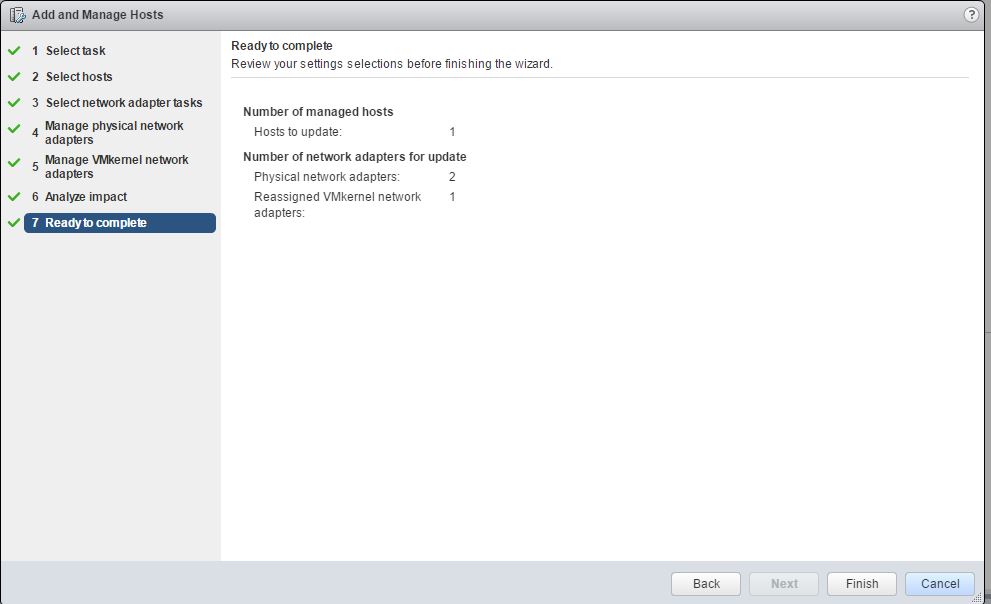
5. Verify that you have “No Impact” on the Analyze impact screen. Click “Next”. Click “Finish” on the final screen.
Migrate VMkernel Networking
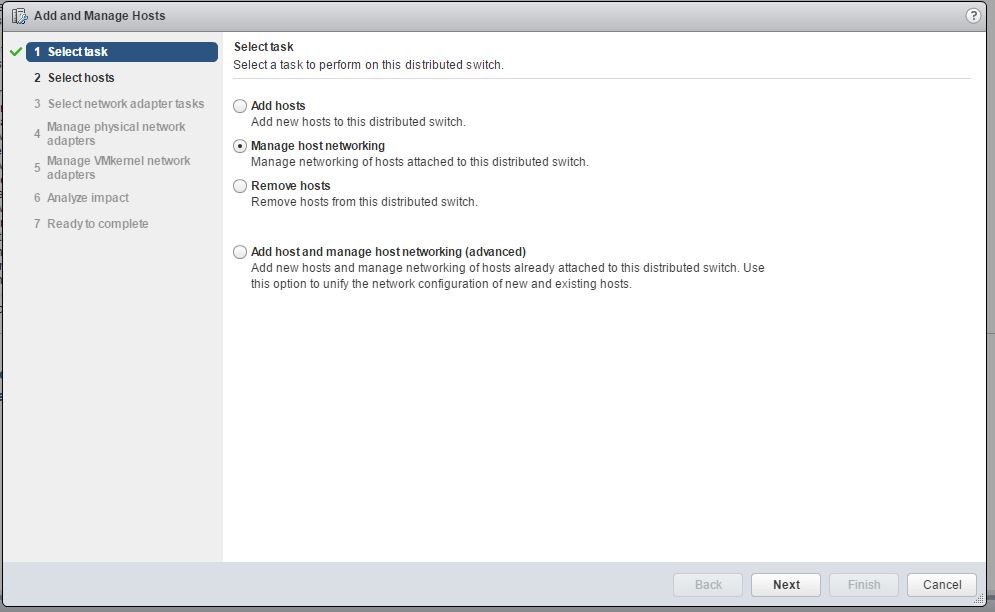
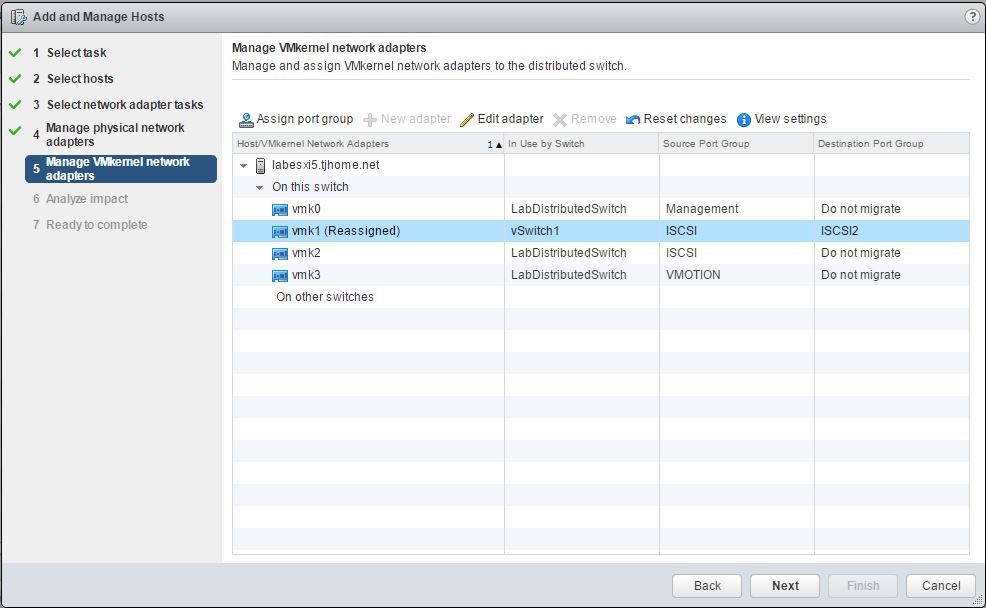
1. Now let’s migrate vmkernel networking. Go back to “Add and manage hosts”. Select “Manage host networking”. Click “Next”. Click the attached Host button and select the host. Click “Next”. Select “Manage VMKernel adapters”. Click “Next”.
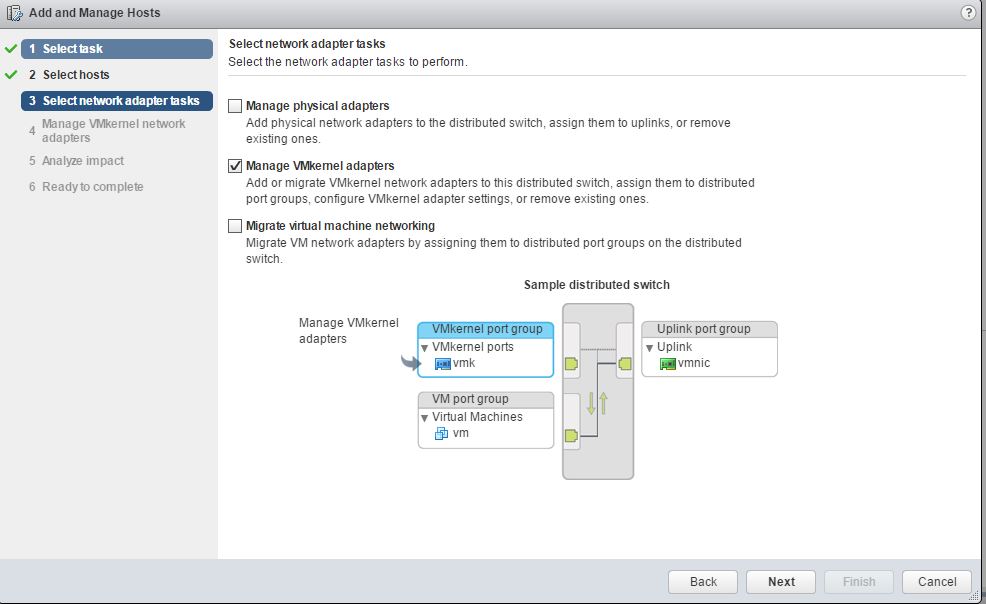
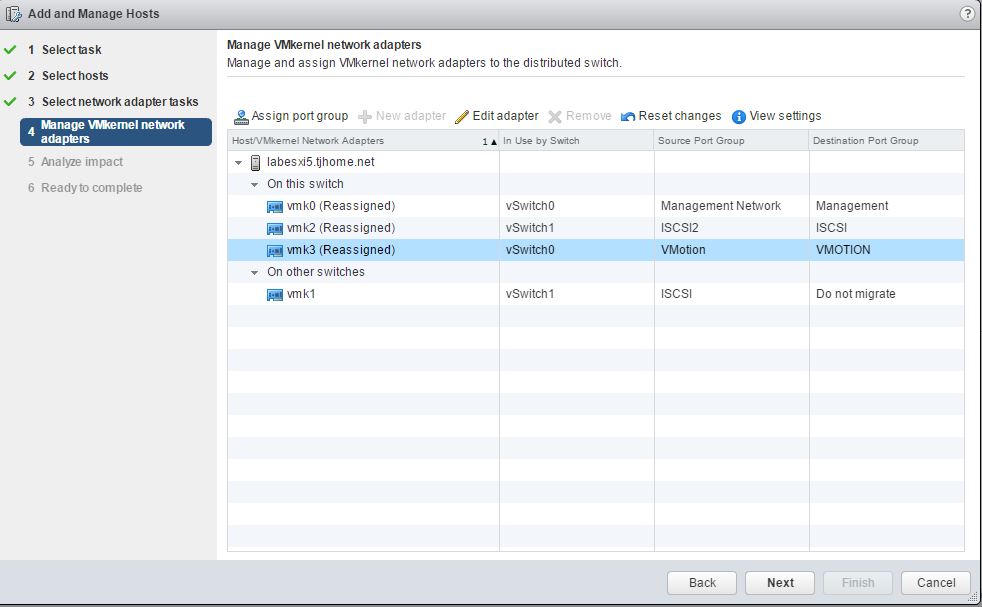
2. From the Manage VMkernal network adapters screen, we will migrate the Mangement Network, ISCSI2 and the VMotion network. We won’t migrate ISCSI, because this is still being used. Click the Assign port group tab and assign each vmkernel port group to it’s associated port group on the distributed switch. In our example, we actually move ISCSI2 vmkernel portgroup from the standard vSwitch to the ISCSI vmkernel portgroup on the new distributed vSwitch. See screenshot below.
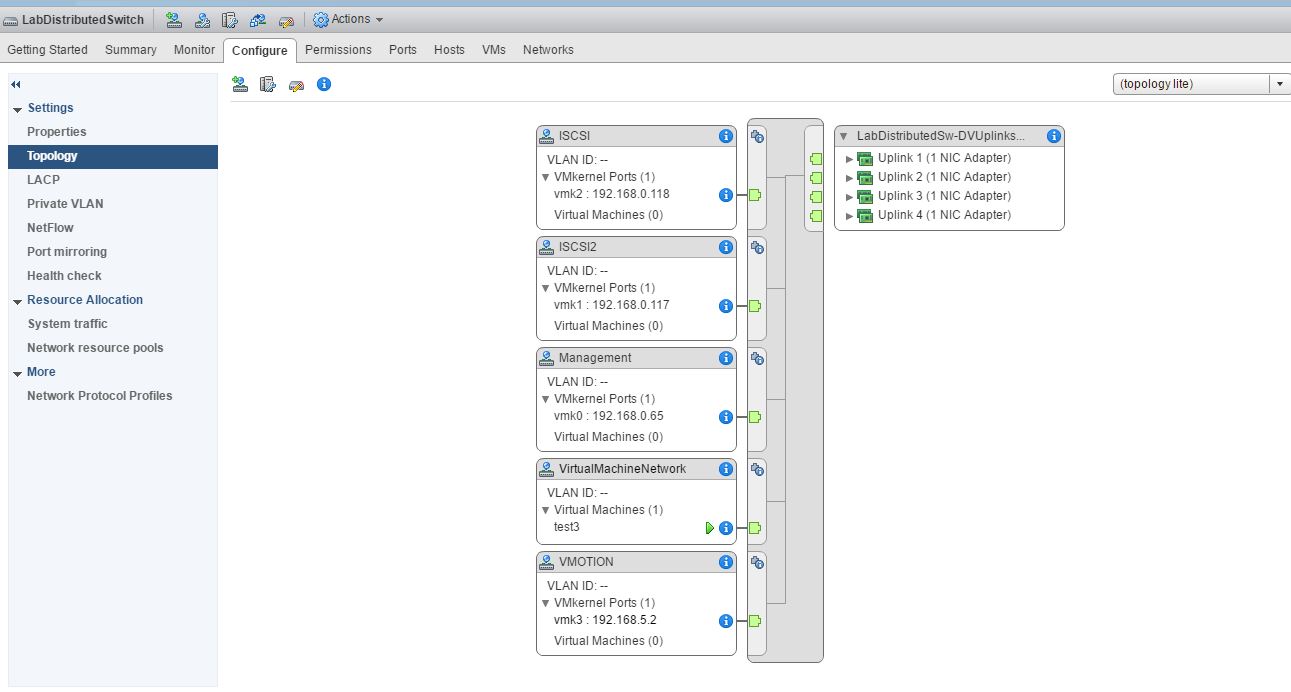
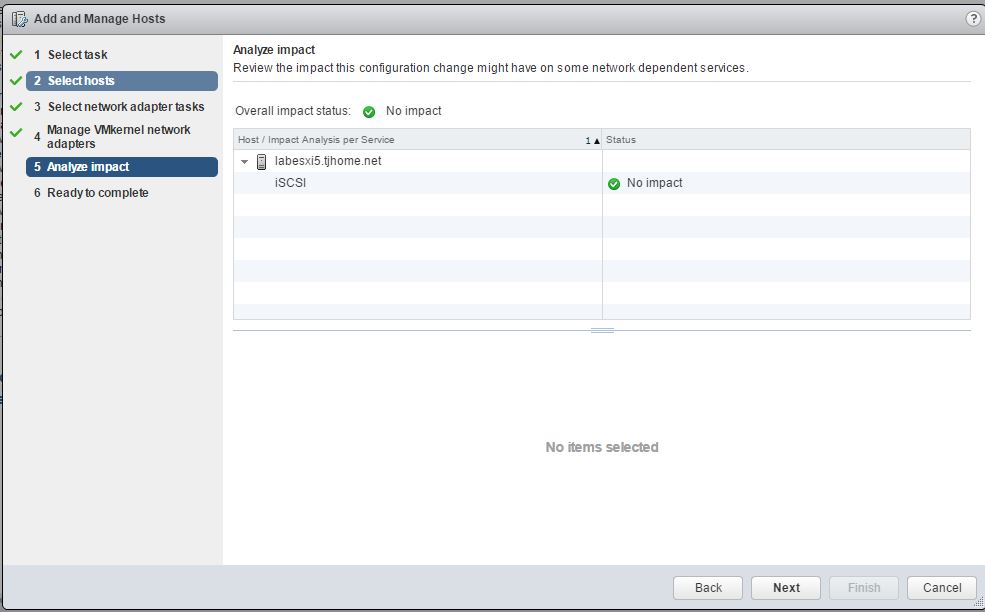
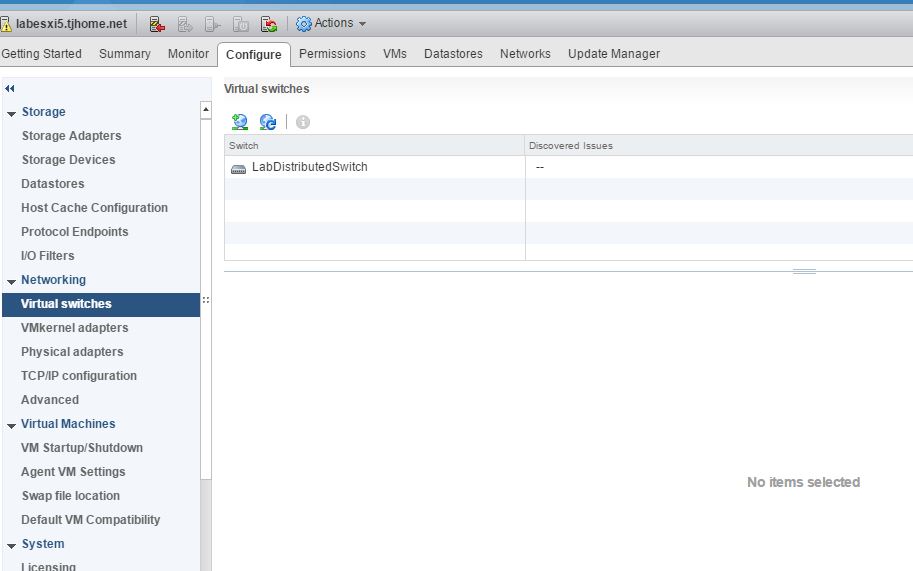
3. Verify that you have NO impact. Click “Next” and “Finish”. When the process completes, you should still have access to your host and we will have successfully migrated the management network of the host. You can verify successful migration of VMkernel ports by going to the “Configure” tab for virtual switches in the Host and Clusters View. We can see that our ports have been migrated successfully to the distributed virtual switch.
Bind ISCSI VMkernel port to Distributed Port Group
1. Go to the Networking Screen and select the ISCSI port group under the distributed virtual switch. Right Click on the Port Group and choose “Edit Settings”.
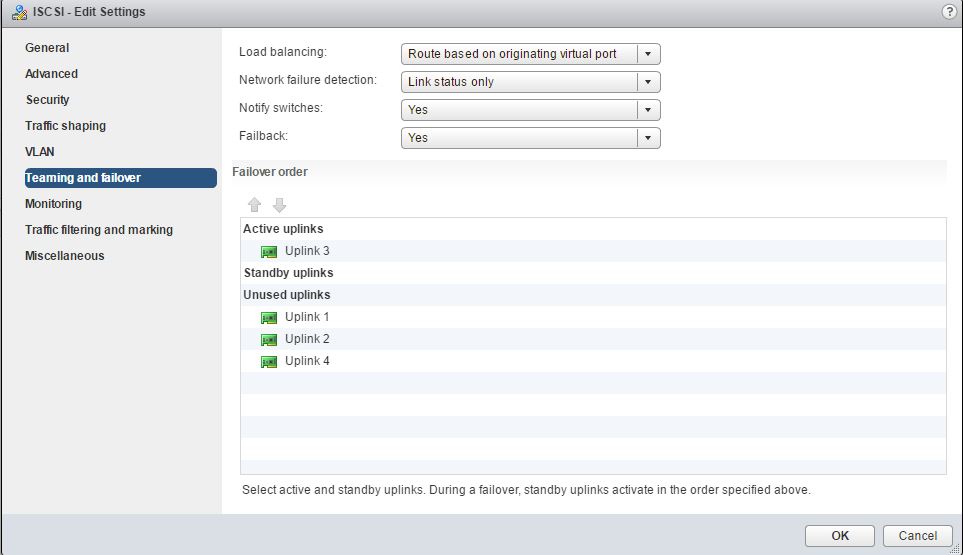
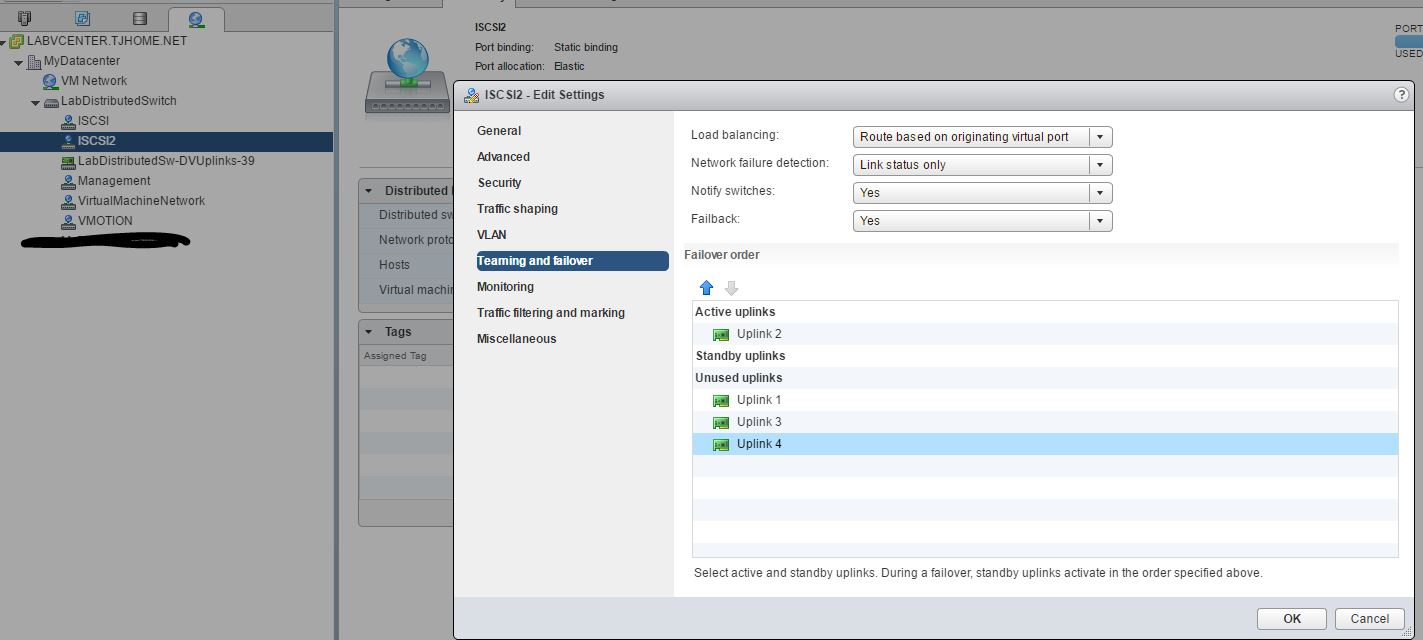
2. Under Edit Settings go to “Teaming and failover”. Make the only Active Uplink the Uplink that is associated with the vmnic that we moved over for ISCSI. In our case vmnic2 was associated with Uplink3, so we will make Uplink3 the only Active uplink. Click “OK”, when done.
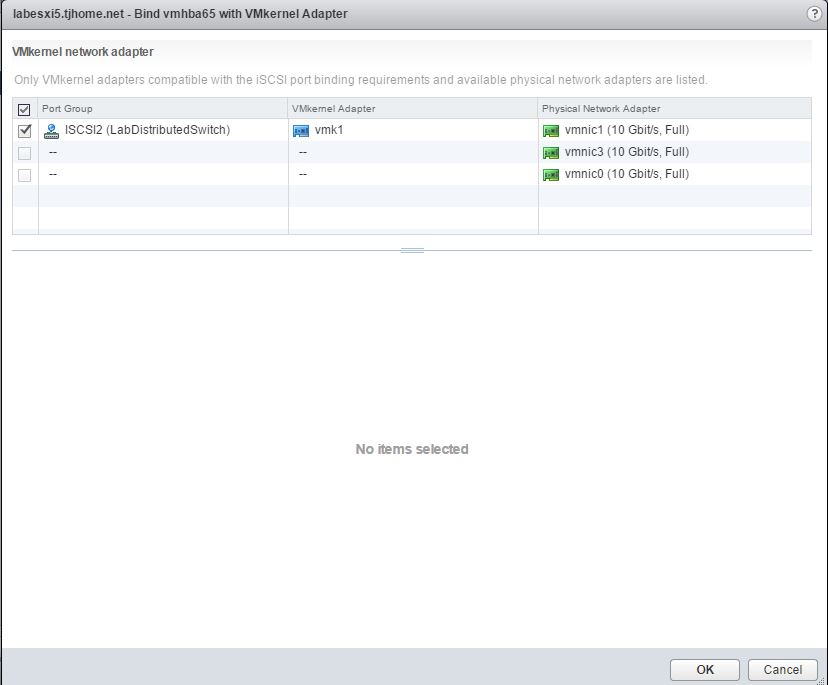
3. Now go to the Host and Clusters View, Storage Adapters, Network port Binding tab for the ISCSI Software Adapter. Click the “+” button to add a binding.
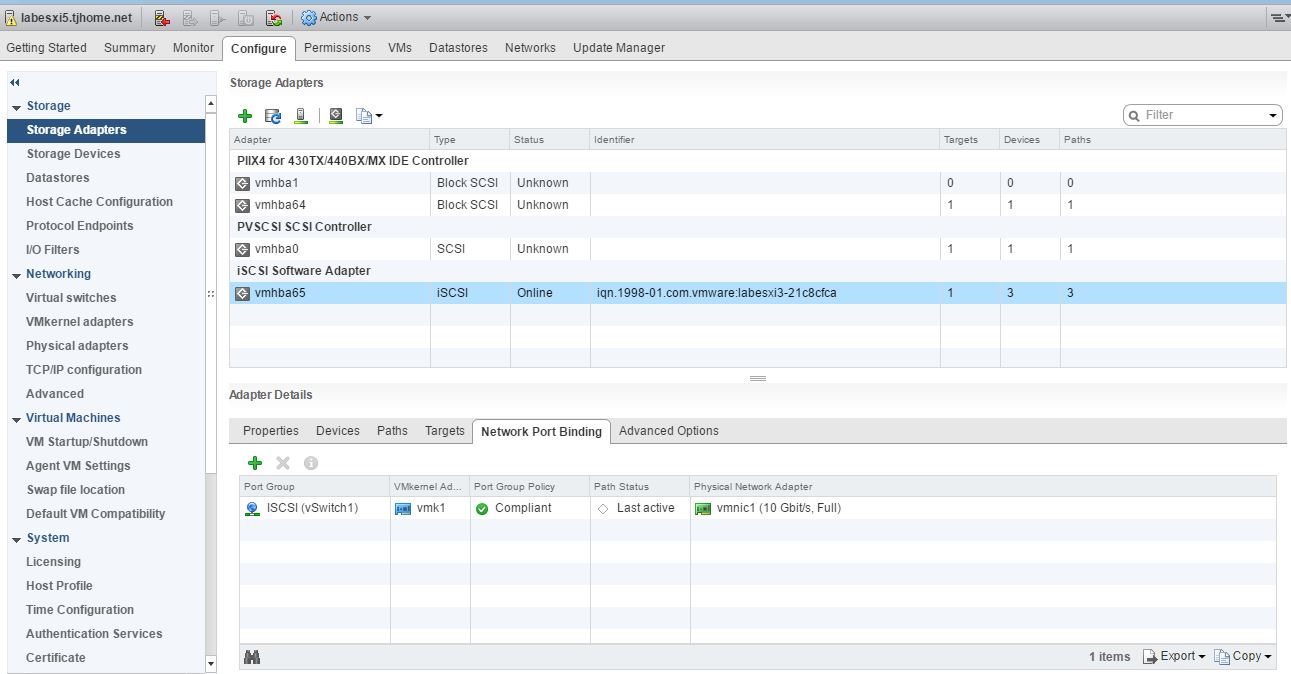
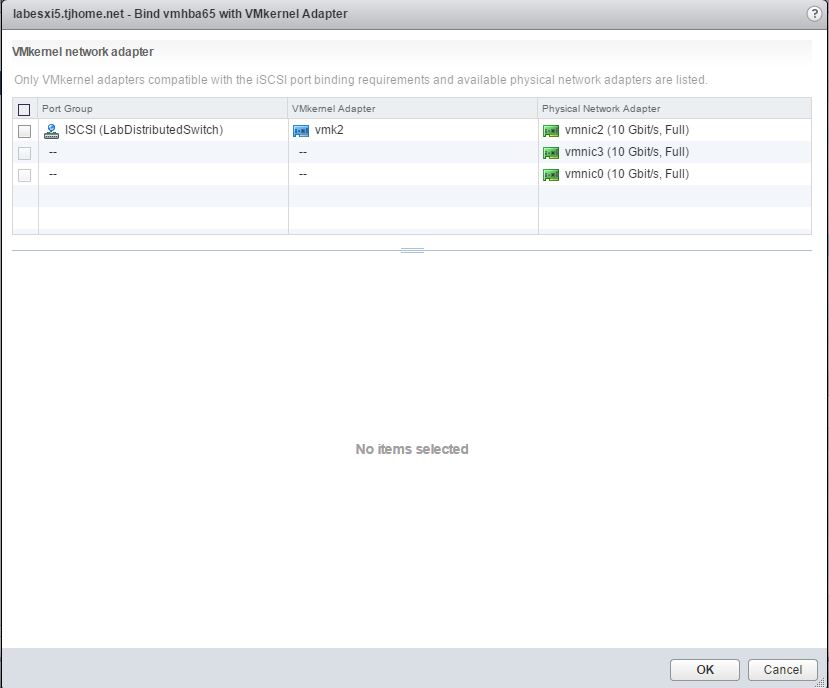
4. Select the ISCSI PortGroup vmk2 adapter. Click OK.
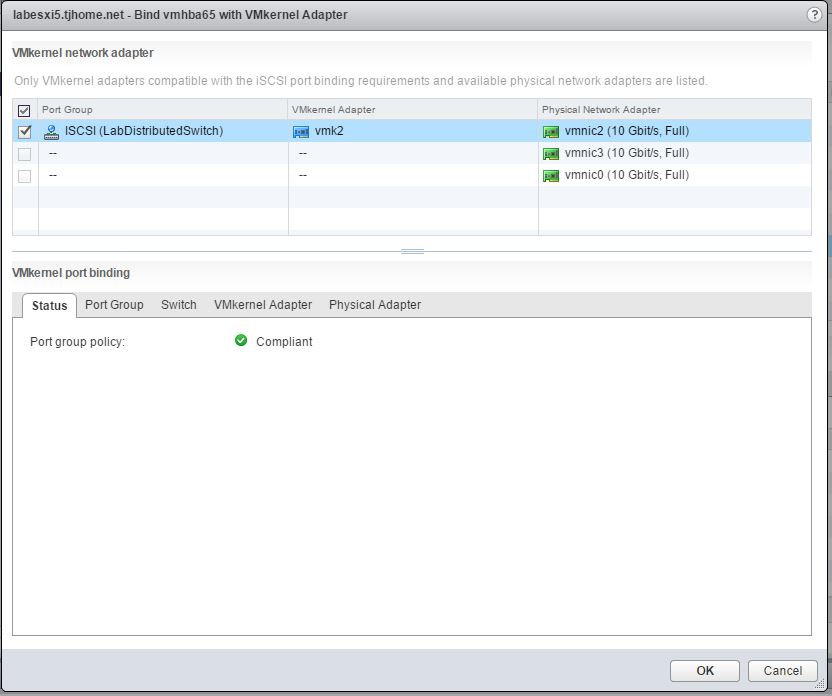
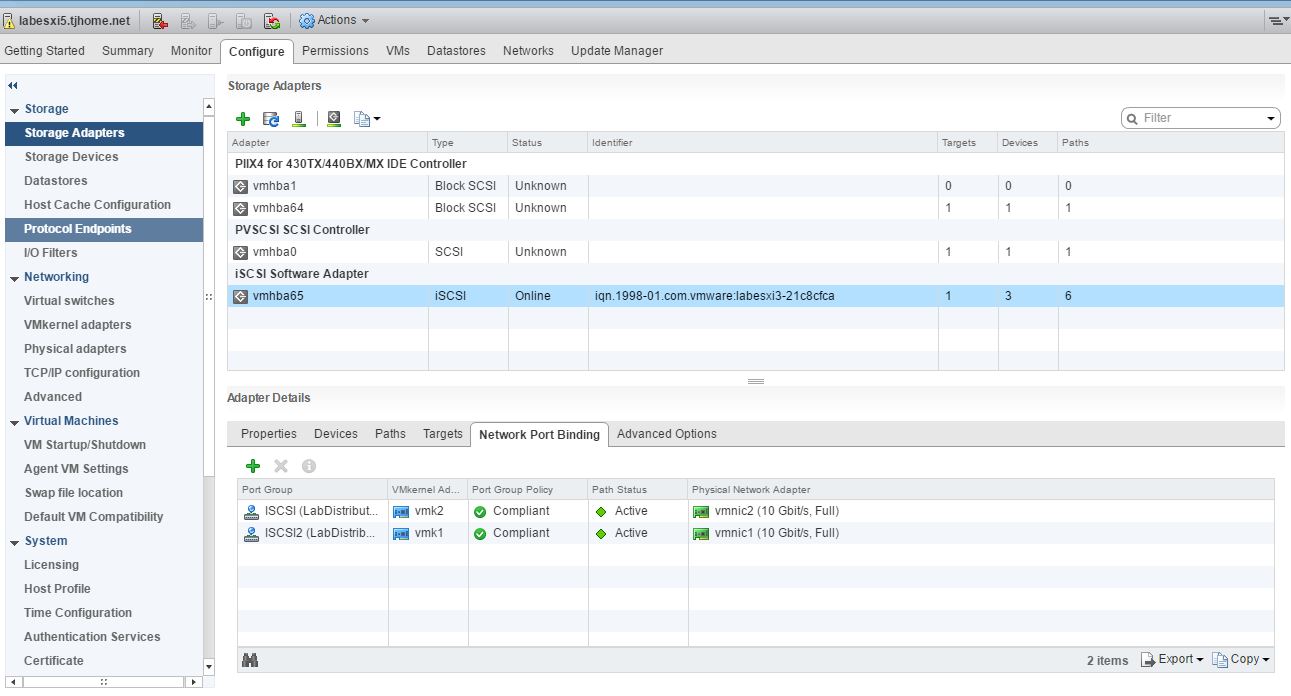
5. You will receive a warning saying you will need to do a rescan. Perform a rescan of the ISCSI software adapter. Notice after the rescan both ports are active now.
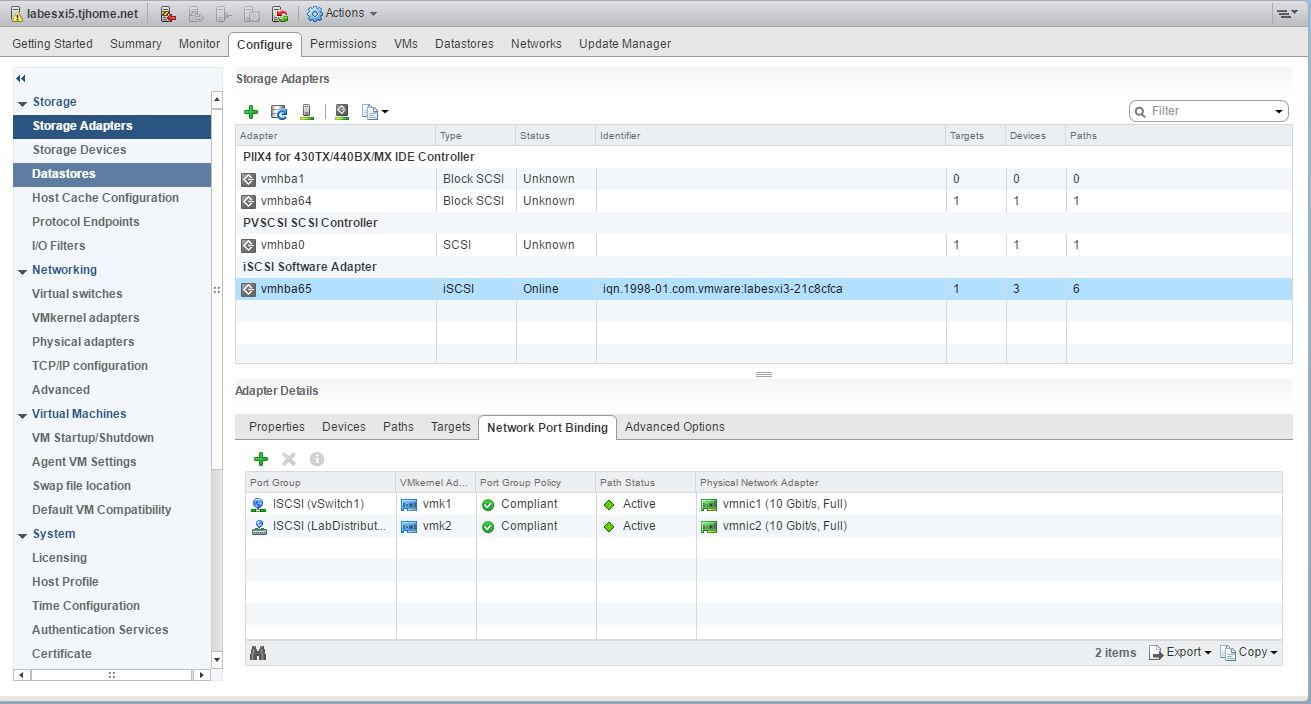
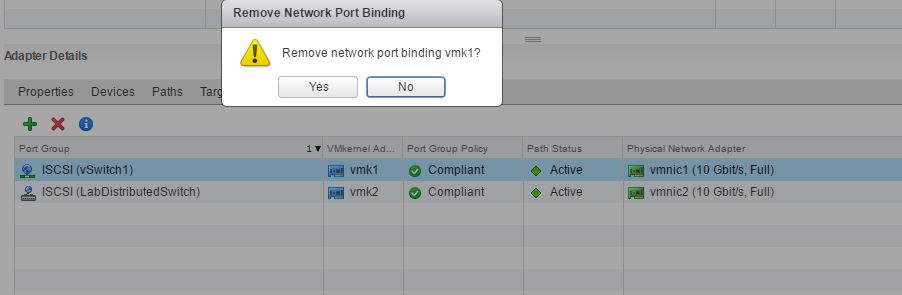
6. Now that we have at least one Active ISCSI port on the Distributed Switch, let’s remove the other ISCSI binding associated with the standard vswitch. Click on the port group associated with the standard switch and click the “X” to remove. Click “Yes” when prompted and then perform a rescan of the storage.
Migrate Virtual Machines to Distributed Switch
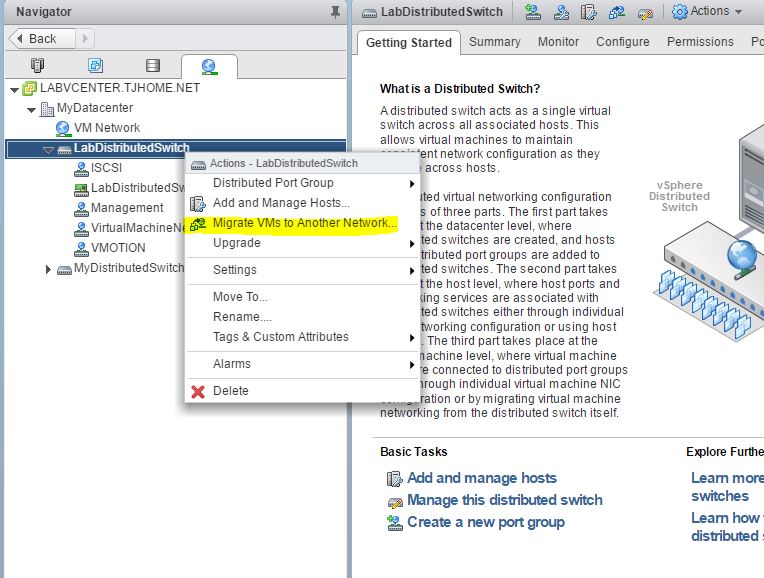
1. Go to the Networking screen. “Right Click” on the distributed virtual switch and choose “Migrate VMs to Another Network”.
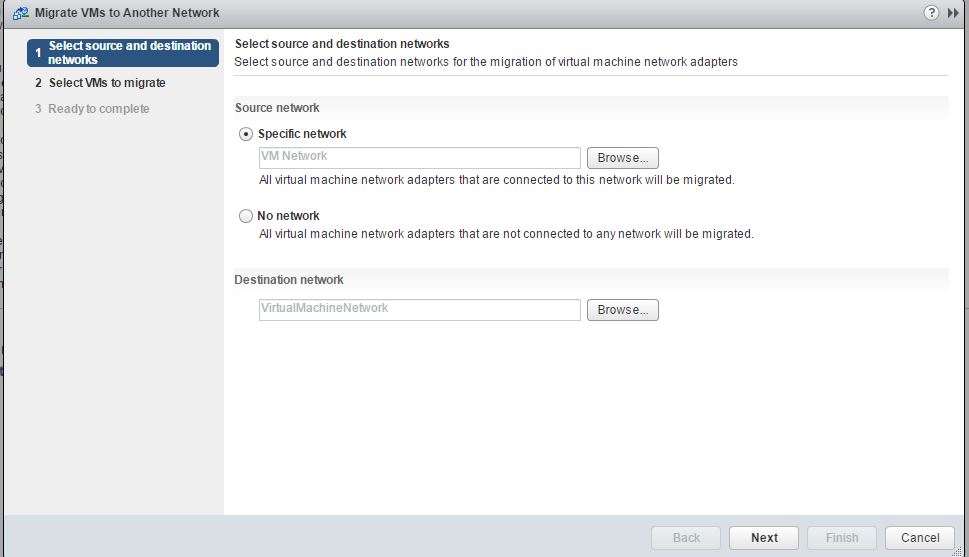
2. Specify the Source network from the standard vswitch and the Destination network on the distributed vswitch. Be sure that these two networks are the same and are on the same subnet/vlan. Click “Next”.
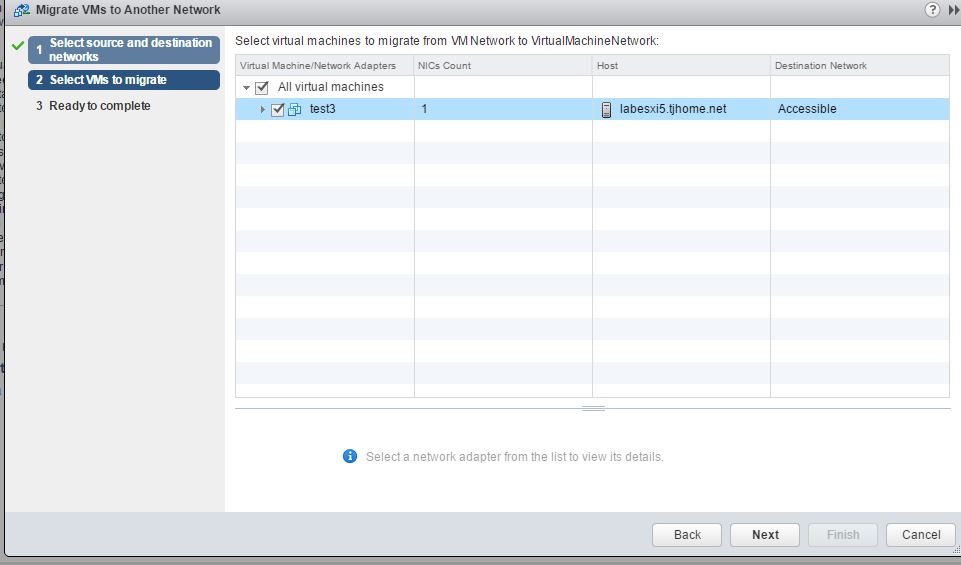
3. Select the VM and click “Next”. Click “Finish” to complete the migration.
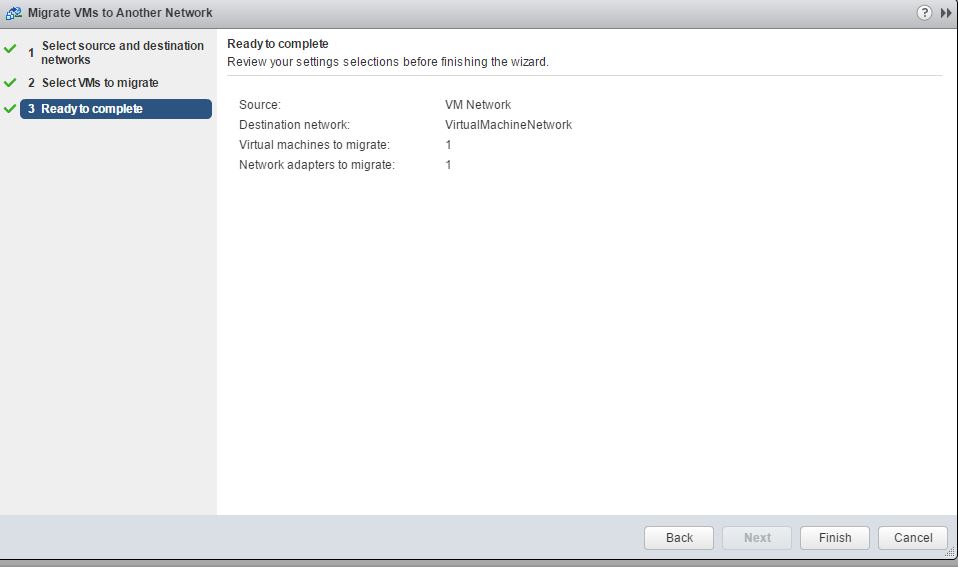
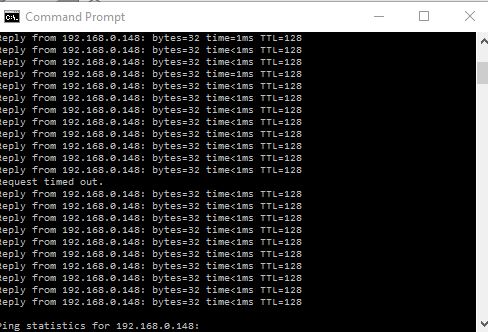
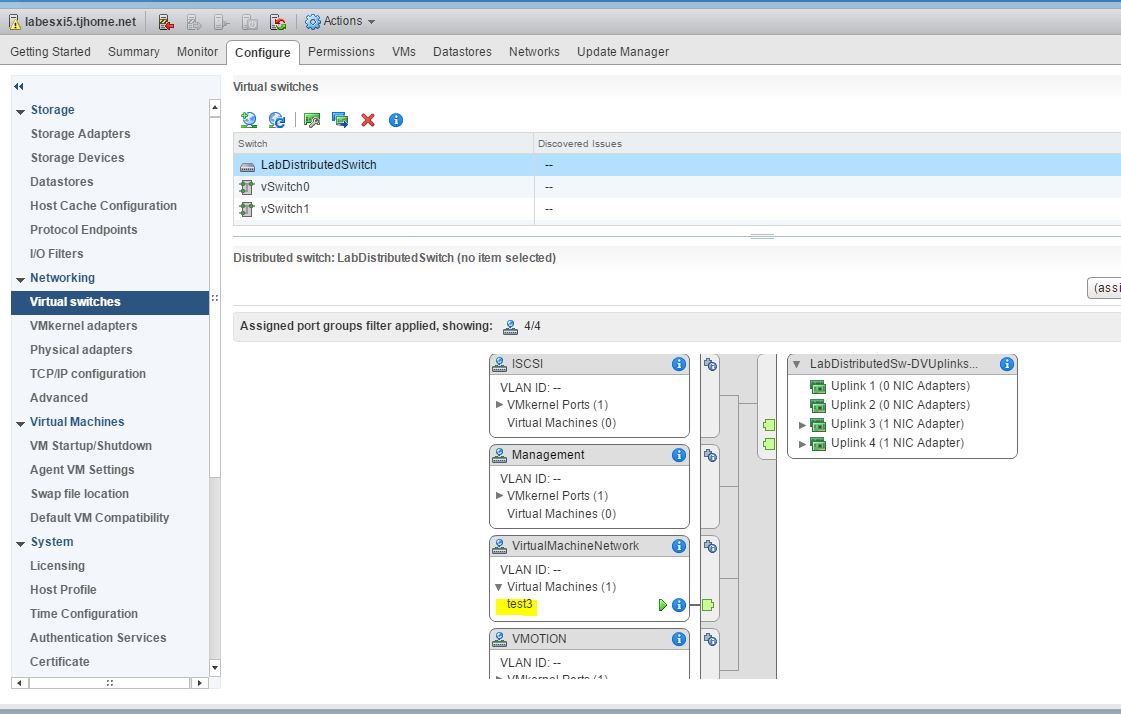
4. You can validate that the VM was migrated successfully if you can still access the VM over the network. A continuous ping test shows it dropped a single packet, similar to a vMotion operation. You can also validate by going back to the virtual switches view for the distributed switch on the host and clusters view. You can see that the test 3 VM is now associated with the distributed virtual switch.
Migrate Remaining Physical Adapters and VMkernal Ports to Distributed Switch
1. Got to the Networking screen. Go to Add and Manage Hosts. Select “Manage host networking”. Select the attached Host. Leave both manage physical adapters and manage vmkernal adapters checked. Click “Next”.
2. Associate the remaining physical adapters to their uplinks on the distributed switch. Click “Next”.
3. Migrate the last ISCSI VMkernel port group to the ISCSI2 VMkernel port group on the distributed switch. Click “Next”.
4. Verify No Impact. Click Next and Finish.
5. Select the ISCSI2 port group on the distributed switch. Go to “Edit Settings”. “Teaming and failover”. Make the uplink associated with vmnic1 on the server the only active uplink. In our case this is Uplink 2, ( the uplink associated with the other physical adapter being used by ISCSI. ) Click “OK”.
6. We can now go back to our ISCSI software adapter in the Host and Clusters view and go to Network Port Binding. Click the “+” Icon, to add a binding.

7. Select the ISCSI2 port group binding. Click “OK”.
8. Perform a Rescan of the ISCSI software adapter and notice that both port groups are now Active.
Well at this point all vmkernel ports, virtual machine and virtual machine networks are migrated to the distributed switch. My Windows 7 VM never went down during the process. There is one final step left and that’s to remove the old standard vSwitches from the host.
Remove Standard vSwitches from Host
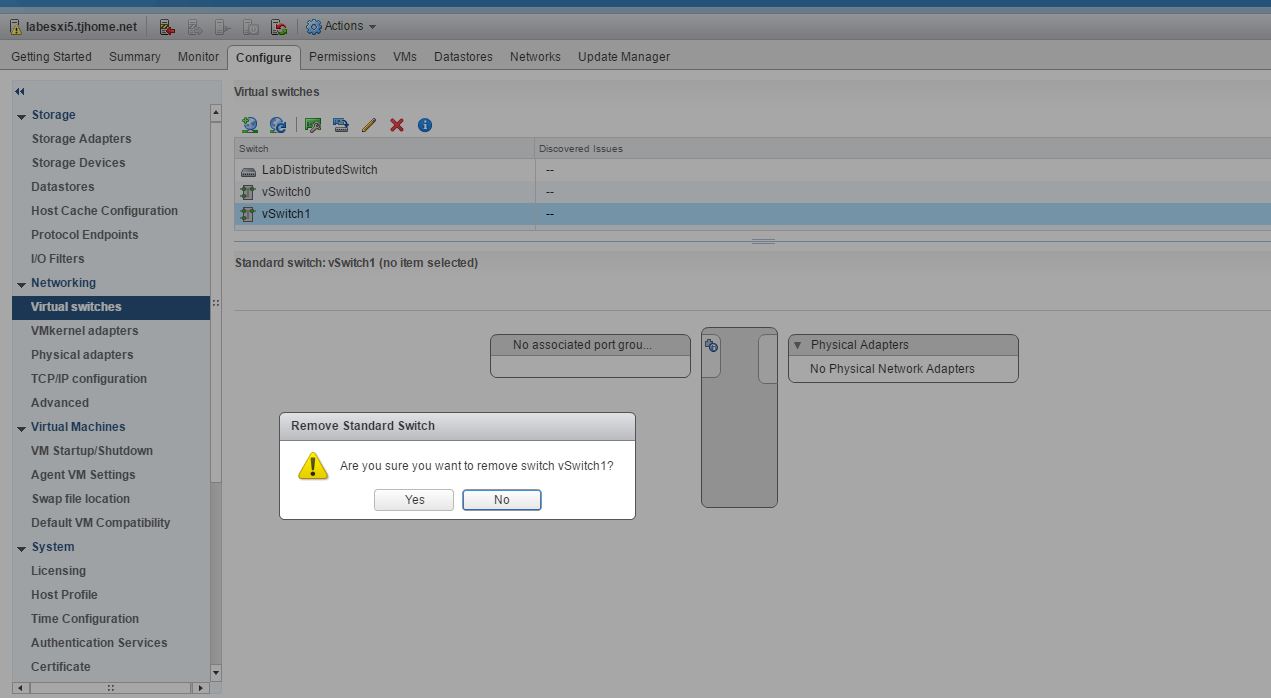
1. Go to virtual switches under the Host and Clusters View and go to Configure. There should be no associated port groups or Physical Adapters on the switch. Click the “X” and click “Yes” to remove each standard switch.
2. Our final two screenshots show our host with a single distributed switch and the topology of our distributed switch.
That wraps up this post on migrating from vSphere standard switches to vSphere distributed switches. We covered migrating physical adapters, vmkernel networking, virtual machine networking and single VLAN ISCSI networking. The process can be quite meticulous, but if done correctly the entire migration can occur with no downtime at all. And naturally, there are ways to automate this for multiple hosts both through the GUI and through PowerCLI, which I will cover in future posts. Thanks again for reading and until next time.